You can grow cat grass in water with no soil at all, and it works surprisingly well. The basic method is simple: soak your seeds for 8–12 hours, drain them, and then either continue rinsing and draining on a schedule until they sprout, or transfer them to a shallow container with a thin layer of water so the roots stay moist while the grass blades grow upward into the air. Most people see sprouts within 2–3 days and harvestable grass within 7–10 days. No pots, no potting mix, no mess. If you want a no-dirt shortcut, this water method is one of the easiest ways to grow cat grass successfully how to grow cat grass without dirt.
How to Grow Cat Grass in Water: Step-by-Step Guide

Marcus Tillwell
8 Jun 2026
Choosing the right cat grass seeds
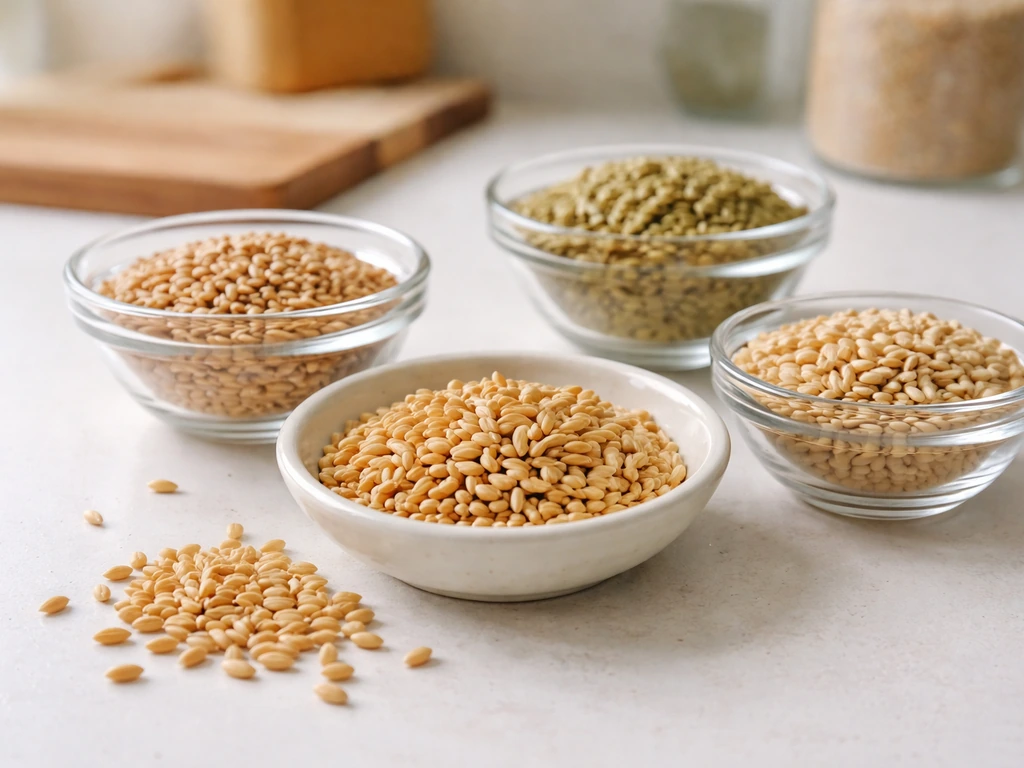
Wheatgrass is the easiest and most forgiving seed for water-based growing, and it's what I'd recommend starting with. It tolerates frequent rinsing, germinates reliably within 1–2 days, and has a seed shelf life of around 2 years when stored properly. Barley grass is a close second and follows essentially the same sprouting schedule. Oats germinate even faster (sometimes in under a day), though they tend to stay short. Any of these three work well in a water-only setup.
Whatever you buy, seed freshness matters. Old or improperly stored seed will give you spotty germination or none at all. Look for seeds labeled specifically for sprouting or growing, not treated seeds meant for outdoor planting. Store them somewhere cool and dry, ideally around 42°F/5.6°C if you have the option. If you're unsure whether a bag of seeds is still good, do a quick paper-towel germination test: wet a paper towel, fold 10 seeds inside it, and check after 3 days. If fewer than 7 out of 10 germinate, the batch isn't worth growing.
Required supplies and simple setup for growing in water
This is a low-equipment method. You don't need a hydroponic kit or anything fancy. Here's what actually works:
- A wide, shallow container (a glass jar, a low bowl, a sprouting tray, or even a repurposed food container) — the wider, the better for airflow
- A fine-mesh strainer or sprouting lid if you're doing the rinse-and-drain method
- A spray bottle for misting once the grass blades are growing
- Wheatgrass, barley, or oat seeds (1–2 tablespoons for a small batch)
- Clean, cool water — tap water works fine if it's drinkable
- A spot near a window with indirect light
The simplest setup for beginners is a wide, shallow glass bowl or dish. You'll use it first as a soaking vessel, then as the growing tray once roots appear. If you want to explore a more dedicated hydroponic approach, that's a different method covered in more depth elsewhere, but for this guide, the bowl-and-water method is what we're doing, and it genuinely works. Hydroponic cat grass uses the same basic principles of keeping seeds moist, refreshing water regularly, and providing enough light, just with a more dedicated setup how to grow cat grass hydroponically.
Step-by-step: grow cat grass seeds in water
- Measure out 1–2 tablespoons of wheatgrass or barley seeds. Rinse them briefly under cool water to remove any dust or debris.
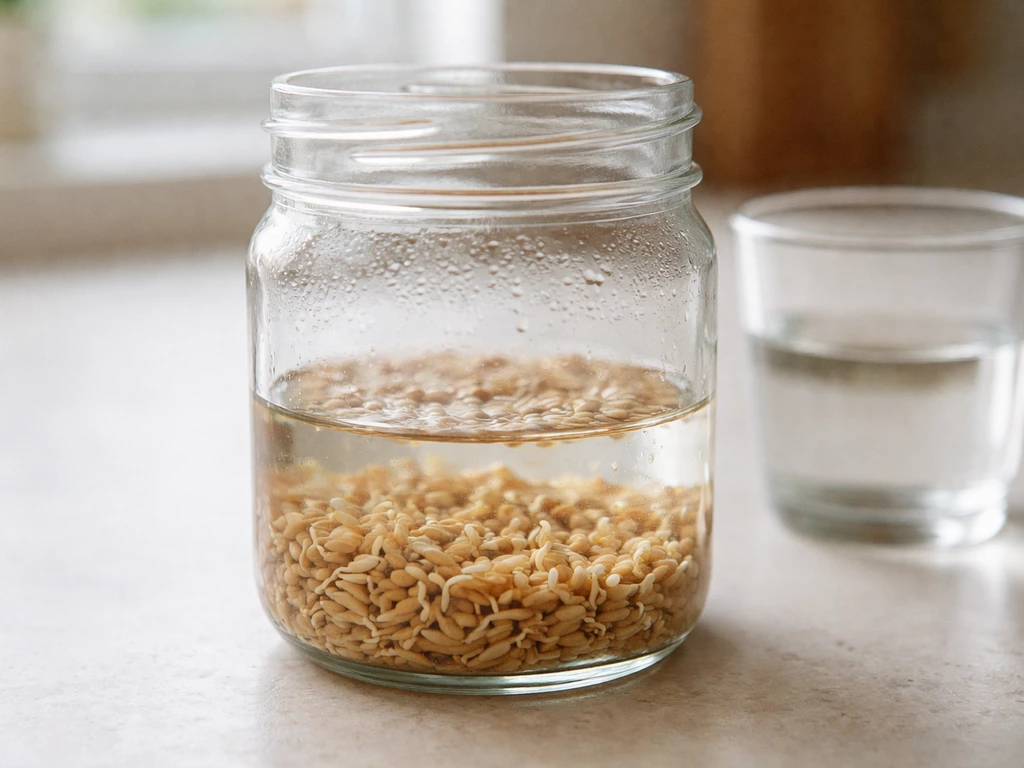
- Place the seeds in your container and cover them with cool water. Let them soak for 8–12 hours (overnight works perfectly). After soaking, you'll notice the seeds have swollen noticeably.
- Drain the water fully. Rinse the seeds again with cool water and drain. Spread them in a single, even layer across the bottom of your wide, shallow container. Avoid piling them up — overcrowding kills airflow and causes mold fast.
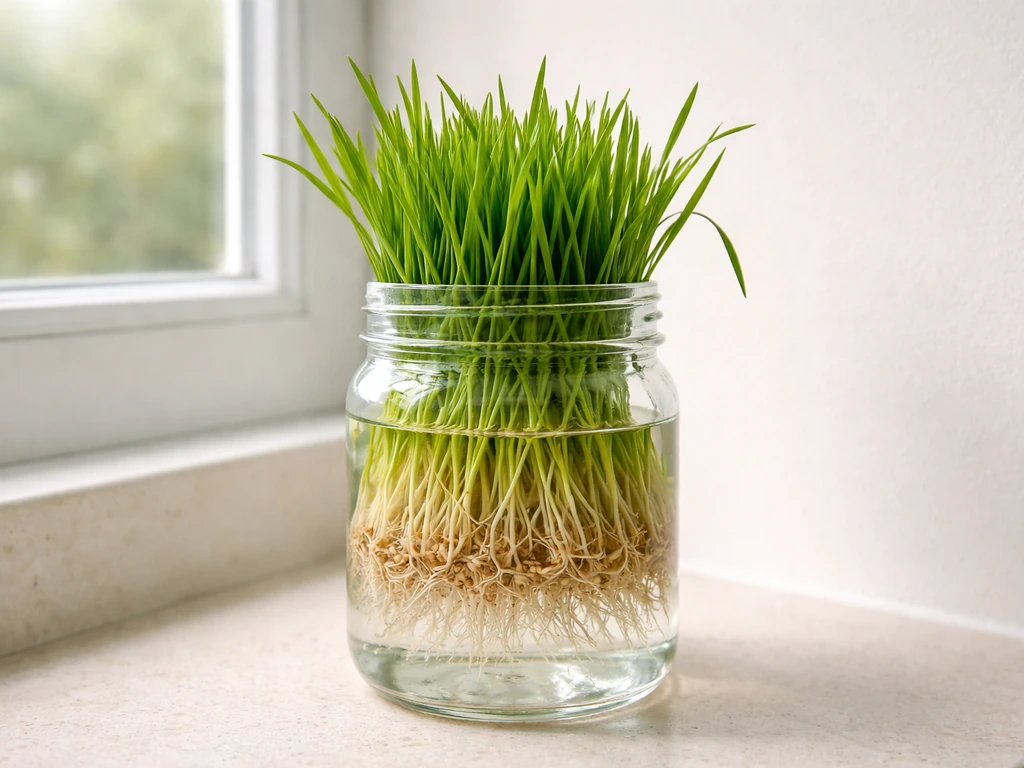
- Add just enough water to keep the bottom of the container barely moist, or continue the rinse-and-drain approach: rinse with cool water every 8–12 hours and drain thoroughly each time. After 1–2 rinse cycles (within about 24 hours), you should see tiny white root tails, roughly 1/16 to 1/8 inch long.
- Once sprouts appear and roots are clearly visible (usually day 2–3), transition to the shallow water method: pour a very thin layer of water into the container — just enough to keep the roots wet, not enough to submerge the seeds. The idea is that roots touch water while the tops of the seeds stay in air.
- Place the container in a spot with indirect light. Keep it away from direct sun at this stage to avoid drying it out too fast or overheating the seeds.
- Continue refreshing the water daily — dump any standing water, rinse the container, and add fresh cool water. You should see upward grass growth within 3–4 days of the initial soak.
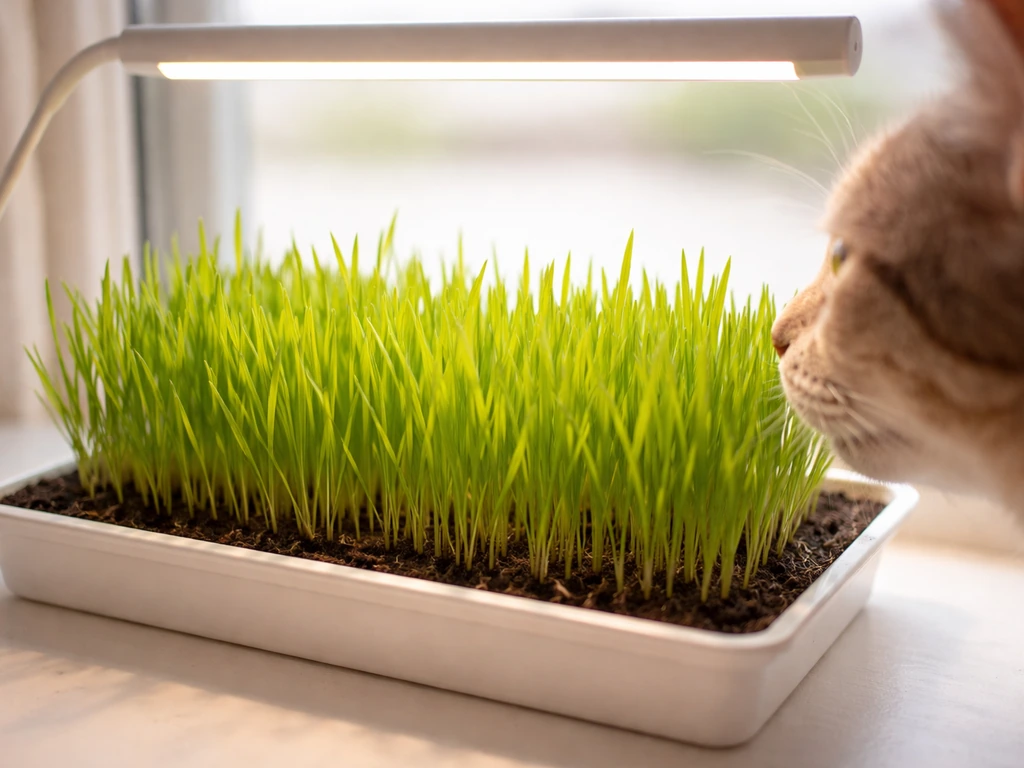
- As the grass blades reach about 2 inches, move the container to a brighter spot near a window where it gets indirect or gentle direct light for 12 or more hours a day.
Watering, light, temperature, and daily care
The biggest mistake people make with water-grown cat grass is letting water sit stagnant. If mold becomes an issue, use this same daily refresh routine and improve airflow and rinsing to keep your cat grass clean letting water sit stagnant. Stagnant water gets slimy and smells bad fast. The fix is simple: refresh the water every single day. Dump it out, give the container a quick rinse, and add fresh cool water. If you're misting instead of using standing water, a light spray from a spray bottle twice a day is enough, you want the roots moist, not swimming.
Temperature matters more than most guides admit. Cat grass grows best at typical indoor room temperatures, somewhere between 65°F and 75°F. Too cold and germination drags out; too warm and you're inviting mold. Don't put the container next to a heat vent or on a sunny windowsill in summer heat. A bright but cool spot is the sweet spot.
For light, once the grass blades are visibly pushing upward (usually around day 3), move the container to indirect sunlight near a window. Aim for 12 or more hours of light per day. If your windowsill doesn't get that much light, a basic grow lamp works fine. When the grass is around 2 inches tall, a bit of direct morning sun is actually helpful for getting strong, green blades rather than pale, leggy growth.
Rinsing is genuinely one of the most critical parts of this whole process. In warm weather or in a warm kitchen, add an extra rinse cycle. Always use cool water, not warm. Warm water during rinsing is one of the underappreciated reasons batches go slimy or moldy before the grass even gets going.
Harvest timing and how to cut and serve to your cat
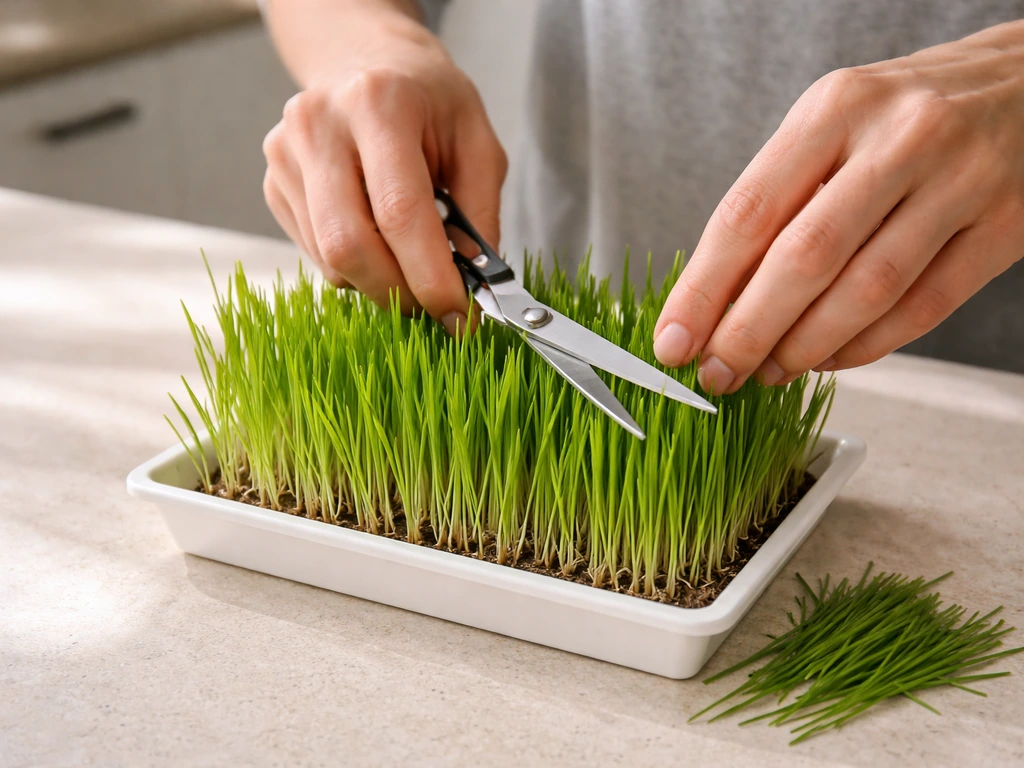
Cat grass grown in water is typically ready to harvest somewhere between day 7 and day 10 after the initial soak, though in cooler conditions it can stretch to 10–14 days. You're looking for blades that are at least 4 inches tall, though many people let it go to 6–8 inches for a fuller cut. Don't wait until it starts yellowing at the tips.
To harvest, use clean scissors and cut the blades about an inch above the base. Cutting cleanly rather than pulling the roots out gives you a chance at regrowth, wheatgrass in particular can produce a second flush of growth after the first cut. That said, water-grown batches typically produce one strong harvest and then decline, so don't count on multiple cuts the way you might with soil-grown grass.
To serve it to your cat, you can either set the whole container in front of them and let them graze directly, or cut a small handful and place it in a clean dish. Either way, rinse the blades with fresh water before offering them, especially if the growing water has been sitting. Cats tend to enjoy freshly cut grass more than blades left sitting out, so trim just before serving when you can.
Common problems and troubleshooting
Mold or slime on the seeds or roots
This is the most common failure with water-based growing, and it almost always comes from one of three things: water not refreshed often enough, seeds packed too densely together, or water that's too warm. Fix it by spreading seeds out more thinly, refreshing water more frequently (twice a day instead of once), and switching to cooler water. One thing worth knowing: fine white fuzzy threads on roots are often just root hairs, not mold. Mold tends to have a musty smell and a cotton-like or slimy texture. If you're in doubt, smell it.
Seeds not sprouting after 2–3 days
This usually points to old seed. Run that paper-towel germination test before you invest more time. It can also happen if the water was too cold during soaking, below about 60°F slows germination significantly. Try a fresh batch with room-temperature water for the initial 8–12 hour soak, then switch to cool water for rinsing.
Leggy, pale, or yellow grass
This is a light problem. Water-grown cat grass has no soil nutrients to fall back on, so it depends entirely on light to produce chlorophyll. If blades are pale yellow or growing tall and thin rather than upright and green, move the container to a brighter spot immediately. If you don't have a good window, a basic LED grow light for 12–14 hours a day fixes this quickly.
Bad smell from the water
A sour or sulfur-like smell means bacteria are building up in the standing water. Refresh the water and rinse the container thoroughly with clean water. If the smell persists after a day of fresh water, the batch has likely turned and you should discard it, clean the container well, and start fresh. Letting contaminated batches continue is not worth the risk to your cat.
Algae buildup on the container
Green slime on the inside of the container is algae, caused by light hitting standing water. Switch to an opaque container, or wrap the outside of a clear container with something to block light from the water. Keep the water itself in the dark, the grass blades above need light, but the water does not.
Food safety and hygiene tips for indoor cat grass
Growing anything in warm, moist water creates conditions where bacteria can multiply quickly, it's the same reason food safety guidelines treat home-sprouted seeds seriously. This doesn't mean water-grown cat grass is dangerous, but it does mean hygiene practices aren't optional.
- Always start with a clean container. Wash it with hot soapy water between batches and rinse thoroughly.
- Use cool, clean water every time you refresh. Never let water sit for more than 24 hours without replacing it.
- Rinse the grass blades with fresh water before serving to your cat, especially if the growing container has been sitting overnight.
- Watch the batch daily. Any sign of heavy mold covering the seeds or grass — not just a few suspicious hairs, but visible fluffy or slimy growth — means it's time to discard the whole batch. The USDA's rule applies here: if food is covered in mold, throw it out.
- Don't try to cut around a moldy section and serve the rest. Discard the full batch, clean the container, and start over.
- Replace each batch every 7–14 days even if it looks fine. Water-grown grass doesn't keep improving with age — it declines, and older batches accumulate microbial buildup.
- Keep the growing container away from raw meat, chemical sprays, or anything else that could contaminate it. Treat it the way you'd treat a food prep surface.
The good news is that a clean, well-maintained batch of water-grown cat grass is genuinely safe and enjoyable for cats. Stick to the daily refresh routine, don't overcrowd the seeds, keep it in a cool and bright spot, and you'll get reliable results. If one batch fails, it's a cheap and fast restart, that's one of the best things about this method.
FAQ
Can I use tap water, or do I need filtered or distilled water to grow cat grass in water?
Tap water is usually fine if you refresh daily. If your tap water is heavily chlorinated or has a strong odor, let it sit out overnight to let chlorine dissipate, then use the same cool temperature routine. Avoid using water that smells bad or has visible particles.
How do I know if I should rinse the seeds every day versus keep them submerged?
Once soaked, it’s safer to keep them moist but not constantly swimming. For a bowl-and-water tray, use a thin water layer once roots appear, and during the earliest germination stage rinse and drain on a schedule so the seeds are hydrated without becoming stagnant.
What container shape works best for water-grown cat grass?
A wide, shallow dish or bowl works better than a deep one because roots stay moist while you can drain and refresh easily. If you use something clear, it can grow algae quickly, so choose an opaque container or block light from the water portion.
How many seeds should I plant per dish, and what does “too dense” look like?
Use a light, even layer with space between seeds, not a thick carpet. If you see long tangles of roots and blades competing immediately, that’s overcrowding, it slows airflow, and it raises the chance of slimy water.
My cat grass roots look fuzzy, is that always mold?
Not always. Fine white, threadlike growth can be root hairs, especially if the texture looks delicate and the smell is normal. Mold is more often musty, with a cottonlike or slimy look on the water surface or container walls.
Should I rotate the container or move it around for better growth?
Yes, rotate once a day if only one side gets light. This helps prevent uneven leaning and helps blades grow more uniformly upright, especially on windowsills with partial light exposure.
What temperature is “too warm” for water-based cat grass?
Aim for indoor room temperatures around 65°F to 75°F. If your room is consistently warmer than that, bacteria can build faster, so increase rinsing frequency and use cool water, also keep the container away from appliances that radiate heat.
Can I harvest more than once from a water-grown batch?
Sometimes you can get a second flush, especially if you cut with clean scissors about an inch above the base. However, many water-only batches decline after the first harvest, so expect one strong cut and plan to restart for ongoing supply.
How soon can I offer cat grass to my cat after cutting?
Trim just before serving when possible, then rinse the blades with fresh water and let excess water drain. This reduces residues from any standing water, and it tends to make the blades more appealing for grazing.
What should I do if the water smells sour or sulfur-like before harvest?
Stop and refresh immediately, rinse the container thoroughly, and replace with cool clean water. If the smell returns after a full day of fresh water, discard the batch and clean the container well before starting over, since continued use isn’t worth the risk for your cat.
Why are my blades pale or tall and thin, even though I’m rinsing daily?
That usually points to insufficient light, water-grown cat grass has no soil nutrients to compensate. Move it to brighter indirect light right away, and if your window is weak, run a grow lamp for about 12 to 14 hours per day to prevent leggy growth.
Do I need to clean the container between batches, or is a quick rinse enough?
A quick rinse is not always enough if there’s algae film or residue. Wash with warm water and soap, then rinse thoroughly and dry before starting a new batch to reduce bacterial buildup and prevent recurring slime or odors.
What’s the safest way to handle the container when my cat is around?
Keep the growing dish on a stable, spill-resistant surface away from direct tipping risk. If your cat tries to paw at it, consider placing it on a high shelf or in a location your cat cannot access, since accidental spills can spread slime and increase mess.
Citations
Wheatgrass seeds: soak in cool water, then rinse and drain every 8–12 hours until tiny rootlets show.
Wheatgrass Sprouting Instructions – Country Creek LLC - https://www.organic-heirloom-seed.com/pages/wheatgrass-sprouting-instructions
Wheatgrass seeds: recommended soak time is 8–12 hours; seeds often show small (≈1/16–1/8 inch) roots after 1–2 rinse/drain cycles.
Wheatgrass – Sproutpeople - https://sproutpeople.org/products/wheatgrass
Barley grass seeds: rinse and drain again in 8–12 hours (consistent cadence used in their barley sprouting instructions).
Barley Grass – Sproutpeople - https://sproutpeople.org/products/barley-grass
Barley grass seeds: pre-soak rinse then soak 8–12 hours; then drain/rest 8–12 hours until tiny sprout “tails” appear.
Organic Barley Grass Sprouting Seeds | Nature’s Root - https://www.naturesroot.co.uk/collections/sprouting-seeds/products/organic-barley-grass-sprouting-seeds
Oats: soaking time 0.5–1 hour; rinse/drain 2 times/day; average time to harvest 1–3 days (for sprout use, illustrating oat’s fast sprouting vs wheat/barley).
From seeds to salads in less than a week! (Sprouting Guide Updated 2022) - https://www.preparednessplano.org/wp-content/uploads/2022/09/Sprouting-Guide-Updated-2022.pdf
Wheatgrass sprouting guidance uses a repeated soak/rinse schedule with 8–12 hour intervals as the key operational parameter (relevant for choosing seed types that tolerate frequent rinsing in water).
Wheatgrass Sprouting Instructions – Country Creek LLC - https://www.organic-heirloom-seed.com/pages/wheatgrass-sprouting-instructions
Sproutpeople lists wheatgrass “Seed Shelf Life: 2 years,” providing a concrete freshness/storage target for wheatgrass seed intended for sprouting/grass.
Wheatgrass – Sproutpeople - https://sproutpeople.org/products/wheatgrass
Johnny’s Selected Seeds notes that seeds remain viable longer when stored cool and dry (example guideline: low temperature around 42°F/5.6°C and low humidity) and that viability declines while germination performance can also drop.
Seed Viability & Storage Guide | Johnny’s Selected Seeds - https://johnnyseeds.com/growers-library/reference-documents/seed-storage-guidelines.html
Purdue notes germination tests are commonly used for leftover seed (and that storage life varies by crop; not all seeds last equally long).
Storing Leftover Garden Seed - Purdue Consumer Horticulture - https://www.purdue.edu/hla/sites/yardandgarden/storing-leftover-garden-seed/?cat=21
NC State Extension provides a paper-towel germination test procedure: check germination after about 7 days and count sprouted seeds after longer (paper towel method for viability estimation).
Seed Viability Test (PDF) | NC State Extension - https://www.ces.ncsu.edu/wp-content/uploads/2015/01/SeedViabilityTest.pdf
BCG’s germination test guide uses the paper towel method and specifies counting germinated seeds after about 3 days (illustrating a concrete step timing for viability sampling).
How to conduct a germination test (PDF) | BCG - https://www.bcg.org.au/wp-content/uploads/Seed-Germination-Test-2019.pdf
Missouri Extension food-safety guidance on sprouting emphasizes the importance of safe handling/discard practices for sprouted seeds grown in water (sprouts can carry pathogens; treat water-based growth as a food-safety risk).
Sprouting Seeds at Home Safely (Extension Food Safety Fact Sheet - July 2018) - https://extension.missouri.edu/media/wysiwyg/Extensiondata/Pro/FoodSafety/Docs/FSfactsheet_SproutingSafely_July2018.pdf
PetMD warns: do not overwater cat grass because this causes mold (a direct cause/fix for mold failures in water-based or over-wet setups).
What Is Cat Grass? Learn How to Grow Cat Grass Indoors | PetMD - https://www.petmd.com/cat/care/evr_ct_how-to-grow-cat-grass
Sproutpeople advises troubleshooting moldy grass/greens with factors including equipment cleanliness, extra rinse(s), and using cold (rather than warm) water for rinses in some situations.
Sprout FAQs – Sproutpeople - https://sproutpeople.org/pages/sprout-faqs
Catit’s guidance includes “don’t overwater” as a core mold-prevention lever, and notes that too many seeds in a small area can limit airflow and increase mold risk.
4 excellent tips to prevent mold in your cat grass - Catit - https://www.catit.com/spotlight/4-excellent-tips-to-prevent-mold-in-your-cat-grass/
Pet Greens instructs to discard cat grass once it has advanced beyond a rinseable stage of mold (a decision rule for indoor pet-grass hygiene).
PET GREENS CAT GRASS How to Care for Upon Receipt (PDF) - https://www.petgreens.com/pdfs/Cat-Grass-Catnip-Care.pdf
USDA FSIS states that if food is covered with mold, you should discard it (a safety principle applicable to moldy pet-grass batches).
Molds on Food: Are They Dangerous? | USDA FSIS - https://www.fsis.usda.gov/food-safety/safe-food-handling-and-preparation/food-safety-basics/molds-food-are-they-dangerous
PetMD specifically provides a key care rule during growth: continue in natural light and water daily via spray bottle while avoiding overwatering.
What Is Cat Grass? Learn How to Grow Cat Grass Indoors | PetMD - https://www.petmd.com/cat/care/evr_ct_how-to-grow-cat-grass
Catgrass.net notes that once blades/sprouts begin sending grass upwards (around day ~3), you should move the container to indirect sunlight near a window or well-lit area.
FAQS – Catgrass (catgrass.net) - https://www.catgrass.net/index.php/faqs/
Sereniseed’s wheatgrass guide: when grass is roughly 2 inches tall, remove lid and place in direct sunlight; for grass growth, 12+ hours/day of indirect light is recommended.
Sereniseed Grow Guide: Wheatgrass - https://www.sereniseed.com/pages/sereniseed-grow-guide-wheatgrass
Sereniseed harvesting guidance: when grass reaches about 4–12 inches, harvest by cutting just above the base of the plant.
Sereniseed Grow Guide: Wheatgrass - https://www.sereniseed.com/pages/sereniseed-grow-guide-wheatgrass
Wheatgrass is ready to harvest when it’s about 4 inches tall, usually 7–10 days after sprouting; use clean scissors and cut about an inch above the soil line (translated to water-grown setups as a “cut height” concept).
Wheatgrass Growing Guide (PDF) - https://www.homeeddirectory.com/sites/default/files/Wheatgrass-Growing-Guide.pdf
MyWheatgrass notes wheatgrass leaves are typically cut when about 7–8 inches tall and that wheatgrass can re-grow once harvested.
Harvesting Wheatgrass - my Wheatgrass - https://www.mywheatgrass.com/grow-harvesting-wheatgrass.shtml
Fruithillfarm’s wheatgrass instructions: after 7–10 days (summer) or 10–14 days (winter), grass can be tall enough (about 15–20 cm) for harvest; use scissors to harvest.
WHEATGRASS GROWING INSTRUCTIONS (PDF) - https://www.fruithillfarm.com/wordpress/wp-content/uploads/Wheatgrass-growing-2_14.pdf
Sproutpeople describes rinsing as “one of THE two most critical aspects of sprouting,” and recommends adding additional rinses in hot times and making rinses as cold as possible for better results.
Rinsing – Sproutpeople - https://sproutpeople.org/pages/rinsing
GardenGuides emphasizes airflow and moderate temperatures to prevent cottonlike mold; it also clarifies that roots hairs can look like fine white threads and are not necessarily mold.
How To Prevent Mold When Growing Wheatgrass - https://www.gardenguides.com/how_2383466_prevent-mold-growing-wheatgrass/
Catit’s mold-prevention point: placing too many seeds in a small area reduces air circulation and increases mold risk—overcrowding is a measurable root cause.
4 excellent tips to prevent mold in your cat grass - Catit - https://www.catit.com/spotlight/4-excellent-tips-to-prevent-mold-in-your-cat-grass/
PetMD: cat grass can develop mold over time, especially if overwatered—so daily observation and reducing standing moisture are essential in water-based methods.
What Is Cat Grass? Learn How to Grow Cat Grass Indoors | PetMD - https://www.petmd.com/cat/care/evr_ct_how-to-grow-cat-grass
FDA notes that sprouting conditions create unique food-safety risks and establishes sprout-specific requirements under the Produce Safety Rule framework (relevant to indoor pet grass grown in water).
FDA Guidance: Standards for the Growing, Harvesting, Packing, and Holding of Sprouts - https://www.fda.gov/regulatory-information/search-fda-guidance-documents/guidance-industry-standards-growing-harvesting-packing-and-holding-sprouts-human-consumption
Missouri Extension fact sheet specifically frames sprouting as a situation where CDC has recommended guidance to reduce risk and includes practices like safe handling and discard guidance for safety.
Sprouting Seeds at Home Safely (Extension Food Safety Fact Sheet - July 2018) - https://extension.missouri.edu/media/wysiwyg/Extensiondata/Pro/FoodSafety/Docs/FSfactsheet_SproutingSafely_July2018.pdf
USDA FSIS general rule: if food is covered with mold, discard it rather than attempting to salvage.
Molds on Food: Are They Dangerous? | USDA FSIS - https://www.fsis.usda.gov/food-safety/safe-food-handling-and-preparation/food-safety-basics/molds-food-are-they-dangerous
Next Article
How to Grow Grass Indoors for Cats: Step-by-Step Guide
Step-by-step indoor cat grass guide: seeds, setup, germination, harvest, re-sowing, and fixes for mold or leggy growth.