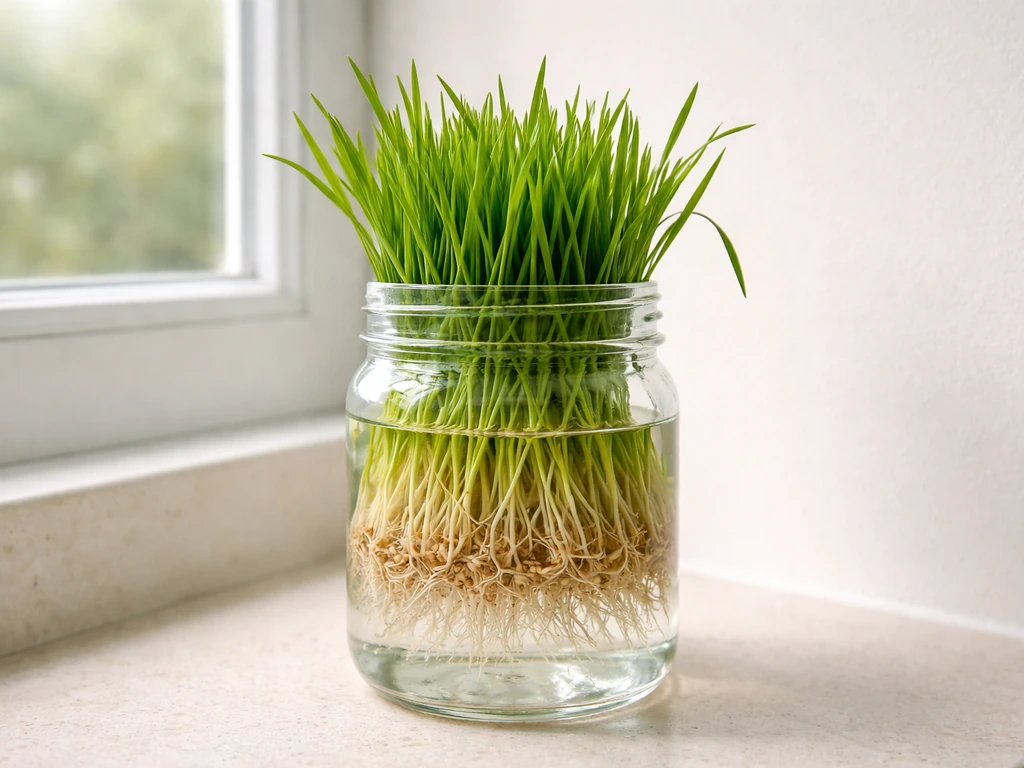
Yes, you can absolutely grow cat grass hydroponically, and it's honestly one of the easiest ways to do it. You skip the soil mess, get faster sprouting, and end up with cleaner grass your cat can graze on safely. The setup is simple: soak your seeds, sprout them on a soilless medium or in a shallow tray with water, keep things rinsed and airy, and you'll have harvest-ready grass in about 10 to 14 days. No special hydroponic equipment required.
How to Grow Cat Grass Hydroponically Step by Step
Marcus Tillwell
15 Jun 2026
What hydroponic cat grass actually means (and why it works)
Cat grass isn't one specific plant. It's a catch-all name for cereal grasses: rye, barley, oat, wheat, or a mix of them. These are fast-germinating grain seeds that cats love to chew. Growing them hydroponically just means skipping the dirt and using water plus a soilless medium instead. Think sprouting trays, hemp felt pads, or even just a shallow tray lined with something to hold moisture and anchor roots.
The reason hydroponics works so well for cat grass is that these seeds don't need nutrient-rich soil to get going. Cereal grass is vigorous and can draw enough from the seed itself through early sprouting, then sustain itself on plain water and light until it reaches harvest height. You're essentially running a quick 10 to 14 day crop cycle, not a long-term garden, so the demands on the system are minimal. The biggest variables you're managing are moisture, airflow, and light, not fancy nutrient solutions.
If you've looked into growing cat grass without dirt or growing it in water specifically, hydroponic tray growing lands right between those approaches. It gives you better root support than a pure water setup while completely eliminating soil and its associated mess and mold risks.
Picking your seeds and pulling together your setup
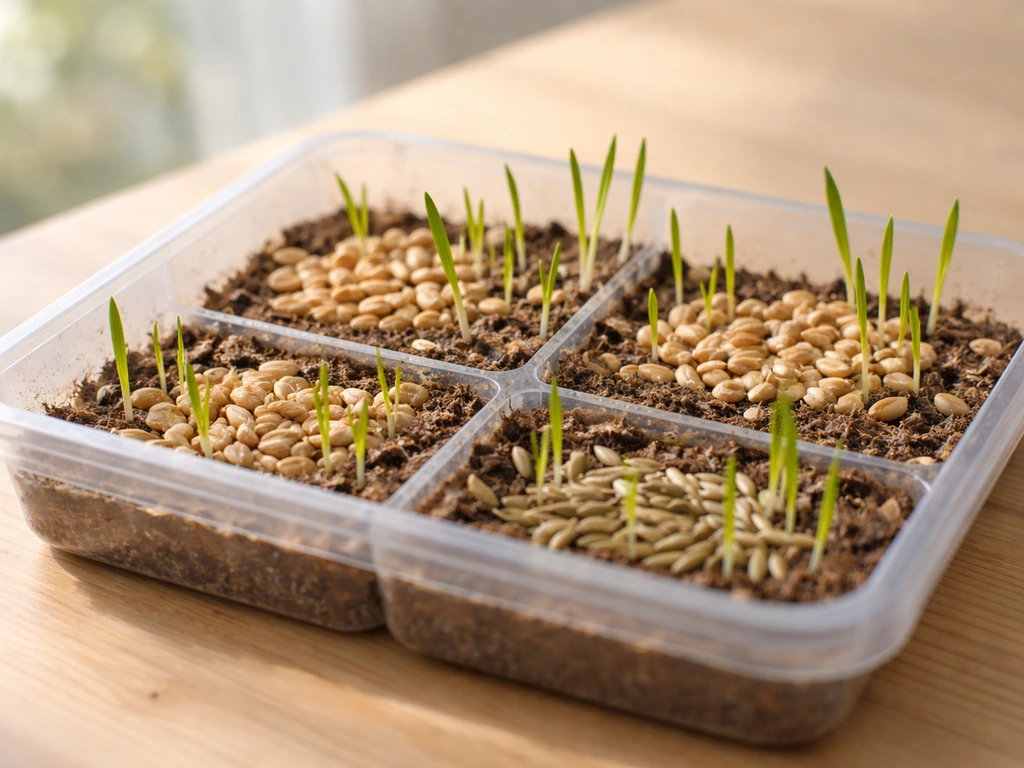
Seeds to use
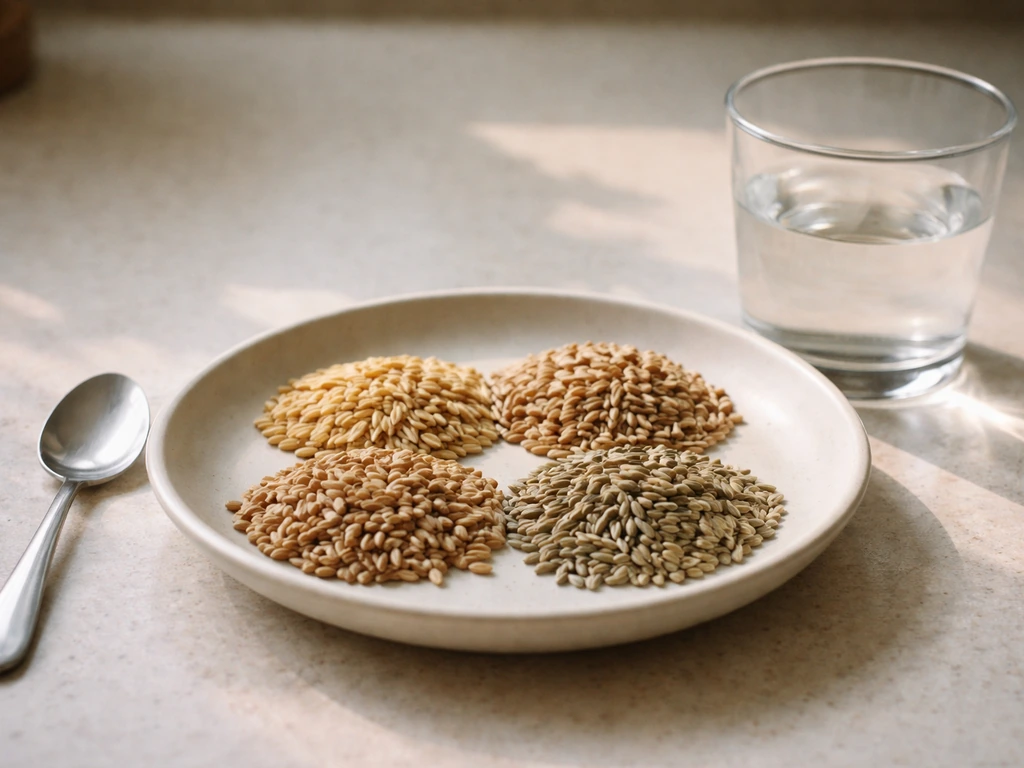
Oat, wheat, barley, and rye all work well. Oats are a great starting point because they sprout fast, usually showing tails within 3 to 5 days. Wheat (wheatgrass) is also popular and grows densely. You can buy dedicated cat grass seed blends, but honestly, buying untreated whole grain seeds works just as well and is often cheaper. The key word is untreated: make sure seeds have not been coated with fungicides, pesticides, or any chemical treatment. Treated seeds are designed for field planting, not for an animal to eat. Look for seeds labeled as food-grade, sprouting-grade, or explicitly untreated. If you follow the steps above, you’ll be well on your way to growing trixie cat grass successfully at home.
Your container and growing medium
You don't need anything fancy. A shallow tray or even a clear cup works for small batches. For a proper soilless setup, hemp felt growing pads are excellent: they hold moisture evenly, allow drainage, and give the roots something to grip. You can also use a fine mesh sprouting tray, a layer of burlap, or even unbleached paper towels in a pinch. If you are wondering what to grow cat grass in, a soilless medium or shallow tray setup is usually the easiest place to start. About 2 tablespoons of seeds covers a small tray or cup for one crop. Plan to run two or three trays on a staggered schedule so you always have grass ready.
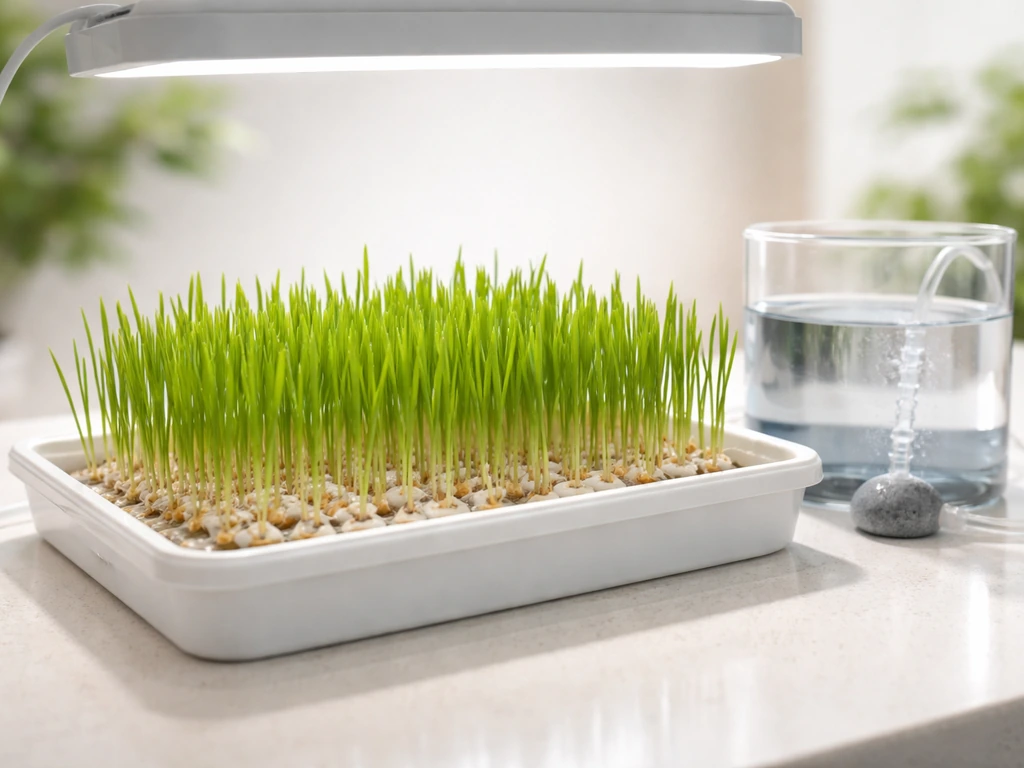
Light and water basics
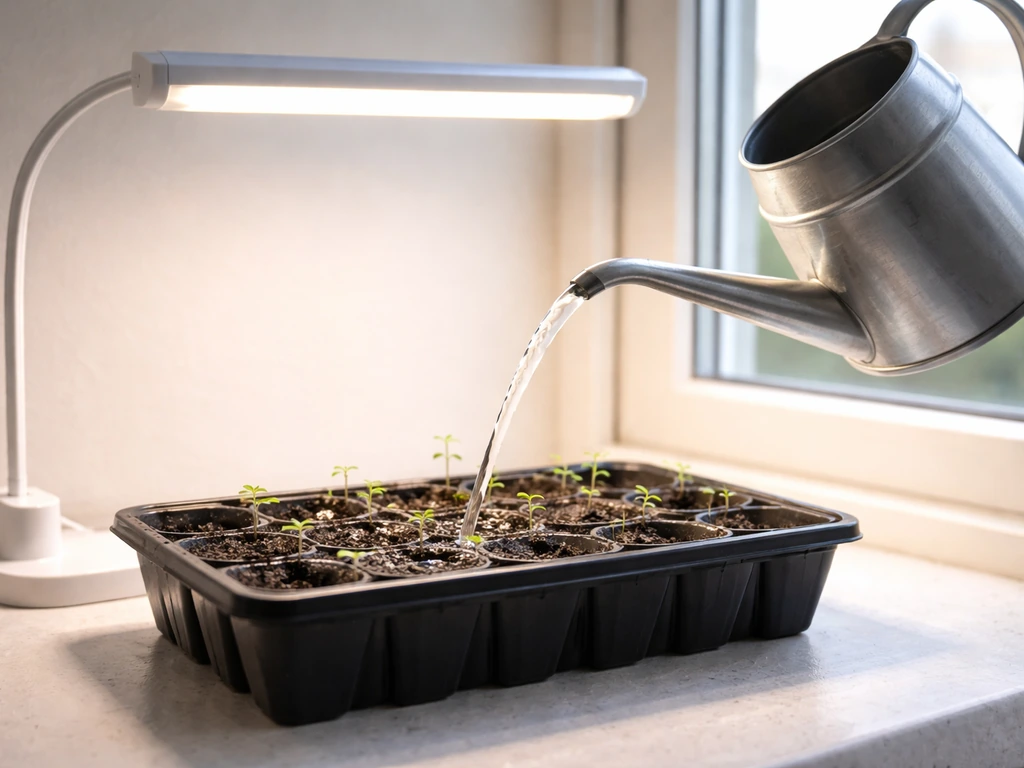
You need a bright spot or a simple grow light. A south-facing windowsill works if it gets several hours of direct or strong indirect light per day. If your setup is in a dim spot, a basic LED grow light set to 12 to 16 hours per day does the job without heating the tray. For water, plain tap water is fine as long as it's cool and not heavily chlorinated. If your tap water smells strongly of chlorine, let it sit out for a few hours before using it, or use filtered water.
Step-by-step: from seeds to grass your cat can eat
- Measure out your seeds: about 2 tablespoons for a small tray or cup. Rinse them under cool water to remove any dust or debris.
- Soak the seeds: place rinsed seeds in a jar or bowl, cover with cool water, and soak for 8 to 12 hours (overnight works perfectly). This softens the seed coat and kick-starts germination.
- Drain and rinse again: after soaking, drain all the water and give the seeds another good rinse. This is important because stagnant soaking water left on the seeds is one of the main causes of slime and mold early on.
- Prepare your growing medium: if you're using hemp felt or a pad, soak it briefly until it's damp throughout, then place it in your tray. If using a mesh tray, just make sure it's clean and ready.
- Spread the seeds: distribute soaked seeds evenly across your damp medium. A dense, even layer is fine. Press them lightly so they make contact with the surface.
- Cover for the first 2 to 3 days: loosely cover the tray with a damp cloth or another tray to keep humidity up and light out during early germination. This mimics a dark, humid environment that speeds sprouting.
- Rinse or mist every 8 to 12 hours: during the sprouting phase, keep seeds from drying out by misting with a spray bottle or pouring a small amount of cool water over the tray and letting it drain. Repeat every 8 to 12 hours.
- Uncover once sprouts are up: after 2 to 3 days you'll see white shoots emerging. Remove the cover and move the tray to your light source.
- Continue watering daily: once the grass is growing in light, water by pouring a small amount of cool water into the tray and draining any excess. You don't want standing water under the roots, just consistent moisture.
- Harvest when the grass reaches 4 to 6 inches tall: this typically happens 10 to 14 days after sprouting. Cut what your cat needs with clean scissors, or place the whole tray out for grazing.
Conditions that make or break your results
| Factor | Target Range / Recommendation | Why It Matters |
|---|---|---|
| Temperature | 65–75°F (18–24°C) | Germination and growth stall below 60°F; heat above 80°F promotes mold |
| Light duration | 12–16 hours per day | Drives photosynthesis and prevents leggy, weak growth |
| Light intensity | Bright indirect sun or LED grow light | Low light = pale, floppy grass; strong light = dense, upright blades |
| Water pH | 6.0–7.0 (neutral to slightly acidic) | Keeps roots healthy; tap water usually falls in this range naturally |
| Rinse frequency | Every 8–12 hours during sprouting, daily during growth | Prevents slime, flushes waste, oxygenates roots |
| Airflow | Gentle circulation (fan on low or open window nearby) | The single biggest factor in preventing mold on dense trays |
| Standing water | None: drain fully after each watering | Roots sitting in stagnant water rot quickly and grow mold fast |
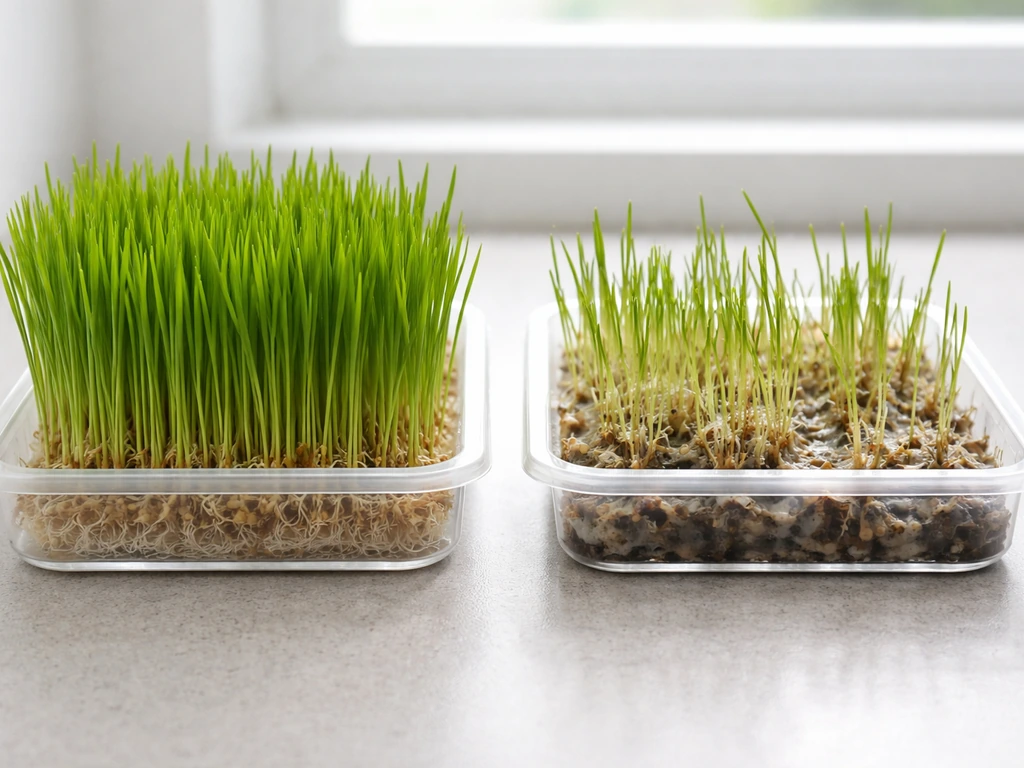
Airflow is the one that most people underestimate. Dense cat grass trays create a humid microclimate right at soil level, and without air movement that humidity breeds mold. Even a small fan blowing gently nearby makes a significant difference. If you don't have a fan, position the tray near a slightly open window where there's some passive air movement.
Harvesting, storage, and keeping a continuous supply
Cat grass is ready to offer your cat when it hits 4 to 6 inches tall, usually around day 10 to 14. You can cut a handful with clean scissors and set it in a small glass of water like a bouquet, or just put the whole tray down and let your cat graze. Either way, the grass will stay good for roughly 1 to 3 weeks depending on how you care for it.
To extend the life of a finished tray, move it to the refrigerator when your cat isn't actively grazing. The cold slows the yellowing process and can add several extra days of freshness. Bring it back out at room temperature for grazing sessions, then back into the fridge. In most homes, expect a good tray to last 7 to 14 days before it starts to yellow and wilt noticeably. Once it goes yellow, discard it and start a fresh tray. Don't try to revive yellowed grass.
The best way to keep a continuous supply is to stagger your planting. Start a new tray every 5 to 7 days. That way, while one tray is being grazed down, the next one is just hitting harvestable height. Two or three trays running on rotation is usually enough for one cat. This is the same principle used in commercial cat grass operations and it completely eliminates the frustrating gap between finished crops.
When things go wrong: common problems and fixes
Mold or slime on the seeds or roots
This is the most common problem with hydroponic cat grass, and it almost always comes down to two things: not rinsing frequently enough during the sprouting phase, or poor drainage leaving standing water under the medium. Fix it by increasing your rinse frequency to every 8 hours, making sure all excess water drains after each rinse, and adding airflow. If mold has developed on an active tray, discard it entirely and start fresh. Don't try to rinse mold off and continue. Clean your container thoroughly with hot water and a little white vinegar before the next planting. Growing cat grass without mold is very doable once airflow and drainage are dialed in.
Leggy, floppy, or uneven growth
Leggy grass that flops over instead of standing upright is almost always a light problem. The grass is stretching toward whatever light it can find, growing long and weak in the process. Move the tray to a brighter spot or lower your grow light closer to the tray, ideally within 4 to 6 inches for an LED panel. Also check your planting density: if seeds are too sparse, you get uneven patches. A thick, even seed layer gives you a dense, supportive mat of grass that holds itself upright.
Poor germination or no sprouting
If seeds aren't sprouting within 4 to 5 days, the most likely culprits are old seeds, treated seeds that can't germinate properly, or water that's too cold. Check your seed source and make sure they're untreated and food or sprouting grade. Seeds stored for more than a year lose viability fast. Also make sure your soaking and rinse water is cool but not cold: water below 55°F can significantly slow germination. If your setup is in a cool room, try moving it somewhere warmer during the sprouting phase.
Yellowing grass before it's ready
Some yellowing is normal at the base of the grass where blades are shaded by others. But if the whole tray is going yellow before the grass even reaches harvestable height, it usually means the roots are sitting in water without oxygen, or the tray is in too little light. Ensure you're draining fully after each watering and that the grass is getting enough light. Yellowing on a tray that's already been grazed and is past its prime is totally normal, that's just the natural end of the crop cycle.
Keeping it safe for your cat and hygienic for you
Seed safety is the starting point. Always use untreated, food-grade, or sprouting-grade cereal grass seeds. Treated field seeds are coated with fungicides or pesticides that are not safe for cats to consume. When in doubt, look for seeds sold specifically for sprouting or for cat grass kits. Brands that cater to the pet or health food market are your safest bet.
Keep your growing containers clean between crops. After discarding a finished tray, wash your container with hot water and a small amount of white vinegar, rinse thoroughly, and let it air dry before replanting. Vinegar removes mineral deposits and kills residual mold spores without leaving any harmful residue. Avoid bleach or chemical cleaners since any residue can affect your next crop and isn't safe for cats.
Don't spray the growing grass with anything other than clean water. Some plant care products, even those labeled natural, are not safe for cats to ingest. Plain water is all you need for hydroponic cat grass, and keeping it simple is the safest approach. If your cat is prone to eating a lot of grass at once rather than just nibbling, limit access to the tray to grazing sessions rather than leaving it out all day. That also helps the tray last longer.
Hydroponic cat grass is genuinely one of the simpler things you can grow at home. Once you have the soak-rinse-sprout routine down and a staggered tray schedule running, it becomes almost automatic. Your cat gets fresh greens year-round, you skip the soil mess, and the whole system can run on a windowsill with seeds and a spray bottle.
FAQ
How do I know the cat grass is safe if I’m using regular whole grains?
Start with a fresh, food or sprouting-grade seed lot and rinse thoroughly, then use a smaller first trial (one tray) to confirm your cat tolerates it. If your cat has never had grass before, offer small amounts for a few days and watch for diarrhea, vomiting, or lethargy. Also avoid any tray that shows fuzzy growth or an off smell, even if it looks limited.
What should I do if my cat seems sick after eating hydroponic cat grass?
Feed-related reactions usually come from either treated seeds or spoiled growth. Use only untreated seeds, keep rinse water clean, and remove any tray that smells sour or looks slimy. If you suspect your cat is reacting, stop the grass immediately and switch to a new tray made from the same seed bag only after confirming it is untreated and your hygiene routine is solid.
Should I keep cat grass available all day, or only during certain times?
Yes. You can rotate trays, but you should also rotate the exact amount of access. Don’t leave a fresh tray out continuously if your cat tends to eat it all at once, instead place it during grazing sessions. A short grazing window reduces moisture exposure cycles and helps you keep the tray from staying in the “too wet” state that encourages mold.
Why does my cat grass mold even though I rinse it regularly?
Set aside a simple “maintenance schedule”: rinse, drain completely, then check for pooling under the pad or tray insert. Even if you rinse every few hours, poor drainage can still cause oxygen starvation around roots. If you see puddles or a consistently damp bottom, reduce rinse volume slightly, increase drainage time after rinsing, and confirm airflow near the tray.
My grass sprouts but looks pale and uneven. What’s the fix?
If seeds sprout but stay pale, it’s usually light intensity or distance rather than water. Increase brightness, shorten the time the tray spends in dim light, and move an LED light closer (still avoiding overheating). If blades are uneven, spread seeds in a thicker, even layer instead of sprinkling lightly.
Is it better to let my cat graze the tray or cut the grass for each meal?
It depends on the seed quality and how your cat eats. If you cut the grass like a bouquet, it often continues to struggle to stay dense, and the remaining base may yellow faster. For best texture, let your cat graze or cut portions only when the tray is at 4 to 6 inches, then discard once the yellowing begins rather than trying to extend a fully finished tray.
Can I reuse the medium or keep growing from a tray after it starts yellowing?
Don’t try to top up a finished tray. Yellow, wilted grass is the end of the crop cycle, and re-using it can also concentrate spoilage microbes. Instead, discard the tray, wash with hot water plus vinegar, let it air dry, then start a new soaking and sprouting batch on your staggered schedule.
Can I refrigerate cat grass for longer storage, and does it change how it looks?
Yes, but treat it like fresh material, not a stored crop. After harvest and while it is still green, you can refrigerate for short-term freshness, but bring it to room temperature for grazing so the blades look and smell normal. Avoid freezing, and don’t store a tray for long periods once it begins to yellow.
How should I adjust for hot or cold rooms to keep germination on schedule?
Temperature affects germination and growth speed. If sprouts are slow, try moving the sprouting tray to a warmer spot during the first days, then keep the grow area consistently comfortable. Very warm areas can also increase moisture and mold risk, so balance warmth with airflow.
Do I need to use anything besides water, like nutrients, or deal with tap water quality?
Use plain water only, but you still need to prevent mineral buildup. If your tap water is hard, it can leave residues that reduce performance and increase grime. In that case, periodically sanitize containers and consider using filtered water, then follow the full clean-and-air-dry routine between crops.
Can I salvage a tray with mold by rinsing it again?
Avoid “fixing” active mold. If you see growth on an actively growing tray, discard it entirely, sanitize the container, and start fresh. After cleanup, increase airflow, ensure the medium drains completely after each rinse, and keep your sprouting area cleaner and less humid.
Why does my cat grass keep falling over, even after I improve the light?
Measure the seed layer and keep it consistent. Too few seeds cause gaps that dry out unevenly and encourage leggy growth, while a thick, even layer supports upright blades. If you keep getting flopping, re-check both the light distance and the seed coverage thickness for the next tray.
What happens if I accidentally planted treated seeds?
If you accidentally used treated seeds, do not offer that tray to your cat. The safest move is to discard the whole batch immediately. Going forward, verify the label says untreated, food-grade, or sprouting-grade, and keep treated field seed away from your growing area.
Citations
Cat grass is typically grown from cereal grasses such as rye, barley, oat, or wheat seeds (and is not a single specific plant).
PetMD — What Is Cat Grass? Learn How to Grow Cat Grass Indoors - https://www.petmd.com/cat/care/evr_ct_how-to-grow-cat-grass
Veterinary guidance notes cat grass isn’t one type; it can be a combination of grasses such as rye, barley, oat, and wheat.
Texas A&M University College of Veterinary Medicine & Biomedical Sciences (VetMed) — Eating Your Greens: The Basics of Cat Grass - https://vetmed.tamu.edu/news/pet-talk/eating-your-greens-the-basics-of-cat-grass/
Sproutpeople explicitly treats cat grass as something that can be grown on soil or a soilless medium (their hemp felt option is described as a planting medium).
Sproutpeople — Cat Grass (product page, growing notes tab) - https://sproutpeople.org/products/cat-grass
A common indoor target is harvest-ready grass in about 10–14 days after sprouting / when it reaches roughly 4 inches tall; grass can last about 1–3 weeks depending on care/decline.
PetMD — What Is Cat Grass? Learn How to Grow Cat Grass Indoors - https://www.petmd.com/cat/care/evr_ct_how-to-grow-cat-grass
Sproutpeople’s cat-grass kit uses a soilless medium (hemp felt) and notes the kit includes clear growing containers/medium; it frames the setup as tray-based growing for a ready supply.
Sproutpeople — Winter Cat Grass Kit (page) - https://sproutpeople.org/products/winter-cat-grass-kit
Fern & Feline describes oat sprouting fast (about 3–5 days) and notes a typical dense tray approach where grass reaches chew height in ~10 days (and trays often require replanting when yellow/declining).
Fern & Feline — Cat Grass: A Complete Guide - https://fernandfeline.com/cat-safe-plants/cat-grass-guide/
Todd’s Seeds instructions specify soaking cat grass seeds in cool water for 8–12 hours, then draining and rinsing before planting.
Todd’s Seeds — How to Grow Todd’s Seeds Cat Grass (catgrass) - https://toddsseeds.com/how-to-grow-todds-seeds-cat-grass-catgrass/
Todd’s Seeds PDF includes a multi-step soak/rinse approach and calls out soaking/then rinse/drain cycles as part of the process for wheatgrass/cat grass.
Todd’s Seeds — How to Grow Cat Grass (PDF) - https://toddsseeds.com/wp-content/uploads/2011/06/24_How_to__Grow_Cat_Grass1.pdf
The OSU Extension PDF instructs soaking overnight for at least 12 hours before sprouting wheatgrass seeds.
Oregon State University Extension (PACE info) — Directions for How to Grow a Wheatgrass Pet Pal (PDF) - https://info.pace.oregonstate.edu/hubfs/Extension/Directions%20for%20How%20to%20Grow%20a%20Wheatgrass%20Pet%20Pal.pdf
Sproutpeople instructs that after soaking, you rinse the seeds one last time and then sprinkle/spread them across the planting medium before continuing with regular rinsing/spraying to keep them from drying out.
Sproutpeople — Cat Grass (product page, growing notes tab) - https://sproutpeople.org/products/cat-grass
Sproutpeople’s kit sampler PDF includes specific rinse timing, including “Rinse and Drain again in 8-12 hours” as part of the early process.
Sproutpeople — Winter Cat Grass Kit (kit sampler PDF) - https://img.sproutpeople.org/pub/docs/print/kitsamplers/wintercat.pdf
Todd’s Seeds PDF includes a rinsing sequence during early sprouting (multiple soak/rinse steps; guidance is embedded in the numbered procedure).
Todd’s Seeds — How to Grow Cat Grass (PDF) - https://toddsseeds.com/wp-content/uploads/2011/06/24_How_to__Grow_Cat_Grass1.pdf
Sproutpeople emphasizes dense planting can reduce air circulation around blades; they recommend/offer soilless media alternatives and note air circulation as a key variable for growth quality.
Sproutpeople — Cat Grass (product page, growing notes tab) - https://sproutpeople.org/products/cat-grass
Sproutpeople’s kit page claims the included approach provides “great drainage and the best air-circulation” (in the context of how their containers/approach are set up).
Sproutpeople — Winter Cat Grass Kit (page) - https://sproutpeople.org/products/winter-cat-grass-kit
The article recommends using a fan to increase air circulation to help prevent mold in container-grown wheatgrass/cat grass.
Gardening on Cloud 9 (archive article) — Preventing Mold When Growing Cat Grass or Wheatgrass in Containers - https://www.gardeningoncloud9.com/200905/how-to-prevent-mold-when-growing-grasses-in-containers-2/
Pet Greens’ care PDF includes a “DO NOT spray Cat Grass with …” safety/care directive (important for hygiene/moisture management depending on their instructions).
Pet Greens — Cat Grass Catnip Care (PDF) - https://www.petgreens.com/pdfs/Cat-Grass-Catnip-Care.pdf
Pet Greens retailer instructions include a refrigeration approach to extend shelf life: rotate containers into the refrigerator “if available” to extend shelf life.
Pet Greens (retailer live grass instructions page) — Live Grass Care Instructions - https://retailer.petgreens.com/pages/live-grass-care-instructions
Pet Greens states cat grass plants generally can last roughly “two to three weeks or even longer,” depending on care (used as a practical expectation for indoor cycles).
Pet Greens (blog) — How to Care for Cat Grass - https://www.petgreens.com/blog/how-to-take-care-of-cat-grass/
PetMD advises discarding/replanting when the grass starts to wilt or turn color; it frames continuous renewal as the answer to quality decline.
PetMD — What Is Cat Grass? Learn How to Grow Cat Grass Indoors - https://www.petmd.com/cat/care/evr_ct_how-to-grow-cat-grass
Whisker Field Farms says cat grass may last about 2–3 weeks when sold, but in real homes indoors it may be closer to 7–14 days before yellowing/wilting.
Whisker Field Farms — How Long Does Cat Grass Last? - https://whiskerfieldfarms.com/how-long-does-cat-grass-last/
Sproutpeople gives a harvest-ready concept tied to growth stage and suggests freshly cut grass is best; their page references a finished crop timeframe and harvest height/periodic availability.
Sproutpeople — Cat Grass (product page, growing notes tab) - https://sproutpeople.org/products/cat-grass
The kit sampler PDF notes a target height for offering to cats: when grass is 4–6 inches tall, it’s placed for grazing.
Sproutpeople — Winter Cat Grass Kit (kit sampler PDF) - https://img.sproutpeople.org/pub/docs/print/kitsamplers/wintercat.pdf
Sproutpeople includes instructions about sprouting prior to planting and indicates there is a dense-tray workflow where you keep grass moist while preventing issues like mold via airflow and drainage.
Sproutpeople — Cat Grass (product page, growing notes tab) - https://sproutpeople.org/products/cat-grass
Fern & Feline notes a tray typically provides good chewing for about 2–3 weeks before starting to yellow/decline.
Fern & Feline — Cat Grass: A Complete Guide - https://fernandfeline.com/cat-safe-plants/cat-grass-guide/
Sproutpeople markets hemp felt and/or other soilless options as media for grass growing, supporting the “sprouting tray / soilless medium” interpretation of hydroponic cat grass.
Sproutpeople — Cat Grass (product page) - https://sproutpeople.org/products/cat-grass
PetMD states the grass is grown indoors and ready quickly; it frames the process as water + sunlight/regular care rather than nutrient-fertilizer hydroponics.
PetMD — What Is Cat Grass? Learn How to Grow Cat Grass Indoors - https://www.petmd.com/cat/care/evr_ct_how-to-grow-cat-grass
Harris Seeds distinguishes treated vs untreated seed and defines untreated seed as “not been treated” using chemical/biological/physical methods (useful when selecting pet-safe/uncoated grains).
Harris Seeds — Hordeum Variegated Cat Grass Seed - https://www.harrisseeds.com/products/22074-hordeum-variegated-cat-grass
Sproutpeople’s hemp felt is described as a planting medium you soak before planting; their cat grass mix quantity guidance is around “2TBSP … per planting” for their small area setup.
Sproutpeople — Hemp Felt Growing Medium (bulk product page) - https://sproutpeople.org/products/hemp-felt-growing-medium-bulk
The kit includes hemp felt soilless medium and a spray bottle; it positions the system for repeated cropping via contained trays/containers rather than outdoor soil.
Sproutpeople — Winter Cat Grass Kit (page) - https://sproutpeople.org/products/winter-cat-grass-kit
The TAMU veterinary piece provides context on cat grass benefits/role and reiterates the cereal-grass composition; this supports safety framing around choosing the right cereal-grass seeds (not unknown grasses).
Texas A&M VetMed — Eating Your Greens: The Basics of Cat Grass - https://vetmed.tamu.edu/news/pet-talk/eating-your-greens-the-basics-of-cat-grass/
Next Article
How to Grow Cat Grass in Water: Step-by-Step Guide
Learn how to grow cat grass in water step by step, from seed choice and sprouting to cutting, care, safety, and troubles