You can grow thick, bright-green Easter grass in a shallow tray in about 10 to 14 days using hard red winter wheat seed, a bit of potting mix or coconut coir, and a sunny windowsill. Soak the seeds overnight, spread them densely in a tray, keep them moist in the dark for a few days until they sprout, then move them into bright indirect light and water once daily. That's the core of it. Everything below fills in the details so yours actually comes out looking like the lush green stuff you see in Easter baskets instead of a patchy, moldy disappointment.
How to Grow Easter Grass Step-by-Step for a Full Tray

Marcus Tillwell
21 Jun 2026
What Easter grass is (and which seeds to use)
Easter grass grown in a tray is essentially wheatgrass: young wheat sprouts harvested before they mature into a grain crop. The most common seed used is hard red winter wheat (Triticum aestivum), sometimes called wheat berries. It germinates fast, grows dense, and produces the dark green blades that look so good peeking out of a basket. You'll find it sold as "wheatgrass seed," "hard red winter wheat," or sometimes just "cat grass" at garden centers, health food stores, or online.
Some products marketed as Easter grass or pet grass are blends: hard red spring wheat mixed with whole oats and whole barley. These blends produce a slightly softer, mixed-texture look and work just as well for holiday display. If you can only find a blend, go for it. The growing process is identical.
One thing worth knowing: the plastic grass sold in craft stores is technically also called Easter grass, but that's a completely different product. This guide is about the living, real-grass version you grow yourself from seed. If you want to grow orchard grass, the steps and conditions are different from wheatgrass, so use orchard grass-specific guidance for soil, spacing, and mowing. It's cheaper, way more impressive, and doesn't end up in a landfill in a single piece.
Supplies you need and the best growing medium
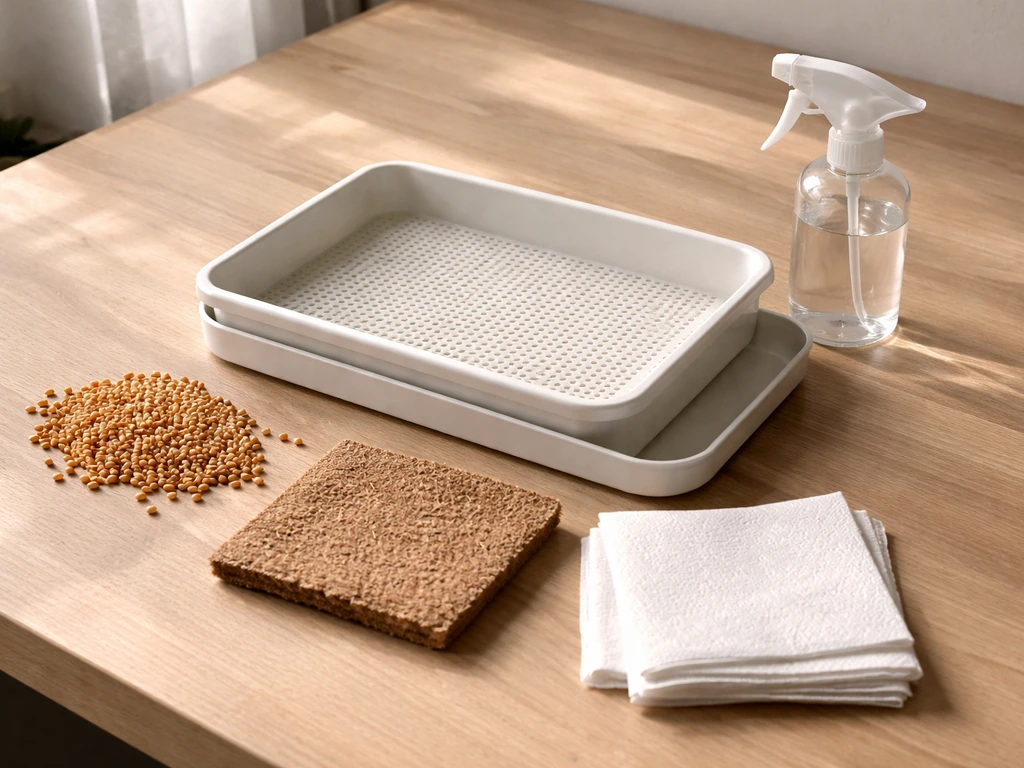
The setup is minimal. You don't need anything fancy, and most of this you can grab from a hardware store or garden center in one trip.
- Hard red winter wheat seed (look for wheatgrass or sprouting wheat berries — organic is fine but not required)
- A shallow tray or container, 2 to 3 inches deep, with drainage holes (a standard 10x20 seed tray works great, as does a repurposed baking pan with holes poked in the bottom)
- A second tray or plate underneath to catch drips
- Loose potting mix, coconut coir, or a hydroponic grow mat (any of these work — details below)
- A spray bottle or watering can with a gentle rose head
- Plastic wrap or a cover tray to create darkness during germination
Potting mix vs. coconut coir vs. paper towel
| Growing Medium | Pros | Cons | Best For |
|---|---|---|---|
| Potting mix | Easy to find, holds moisture well, looks natural | Can compact and stay too wet if overwatered, higher mold risk | Beginners who want a simple setup |
| Coconut coir | Excellent drainage, light texture, resists mold better than soil | Needs to be hydrated before use, less widely stocked | Anyone who's had mold problems before |
| Hydroponic grow mat (micro mat) | No soil mess, even moisture distribution, great drainage | Costs more, harder to find locally | Clean displays, gift presentations |
| Paper towel (sprouting only) | Zero cost, works for germination stage | Too thin for a full display tray, dries out fast | Testing seed viability only |
Coconut coir is genuinely the best option for Easter grass trays. It drains well, resists mold, and produces clean-looking results. If you already have potting soil at home, that works too, just be careful not to overwater it. Avoid dense garden soil or anything that compacts easily; poor drainage is the number one cause of moldy trays.
Step-by-step planting and watering (start today)
Here's the full process from seed to tray, in the order you actually do it. If you're starting today, step one happens tonight.
- Soak the seeds: Measure out your wheat berries and rinse them under cool water. Then submerge them in a bowl of water and soak for 8 to 12 hours (overnight works perfectly). This softens the seed coat and dramatically speeds up germination. Drain and rinse the seeds after soaking — don't leave them sitting in water.
- Prep your tray: Fill your tray with 1 to 1.5 inches of moistened coconut coir or potting mix. It should feel like a wrung-out sponge — damp throughout but not dripping. Make sure the tray has drainage holes and a catch tray underneath.
- Spread the seeds: Scatter the soaked seeds across the surface in a single dense layer. You want seeds touching but not piled on top of each other. For a standard 10x20 tray, roughly 1.5 to 2 cups of dry seed (before soaking) is about right. Cover the seeds lightly with about 1/8 inch of growing medium.
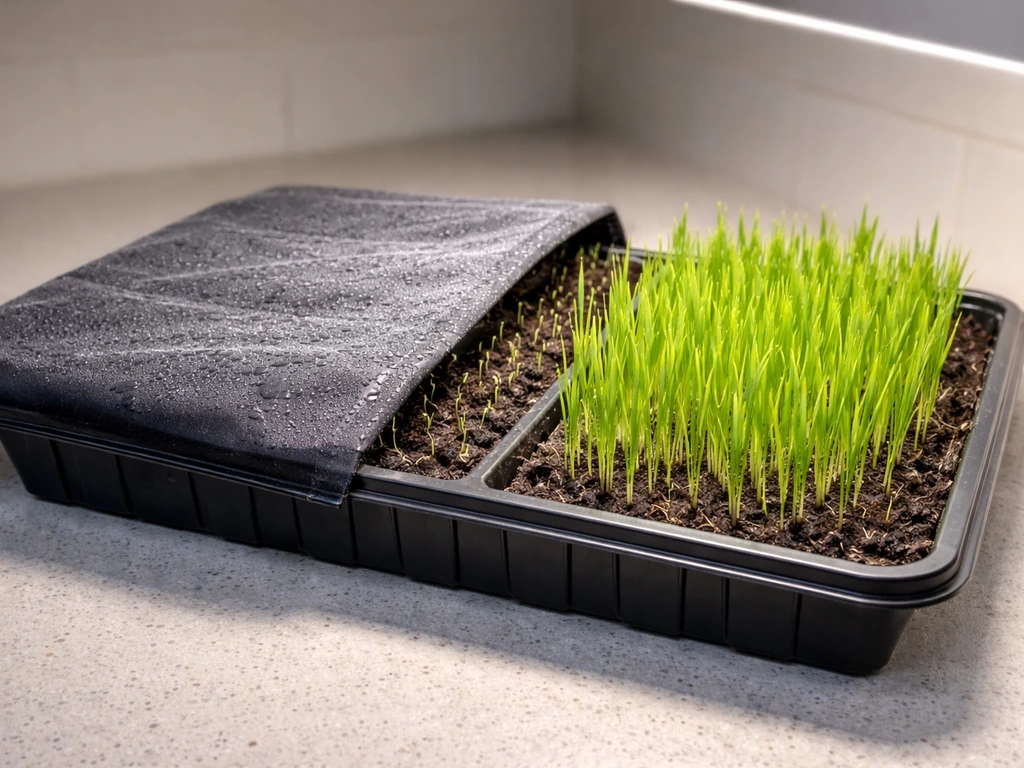
- Cover and keep dark: Lay plastic wrap or an inverted tray over the planted seeds. This keeps moisture in and light out, which is exactly what germinating wheat needs. Set the tray somewhere at room temperature — away from cold drafts or direct heat.
- Water during germination: Lift the cover once or twice a day to check moisture. If the surface looks dry, mist it lightly with a spray bottle. You're not trying to soak the tray — just keep the surface from drying out. Drain off any standing water in the catch tray each time you check.
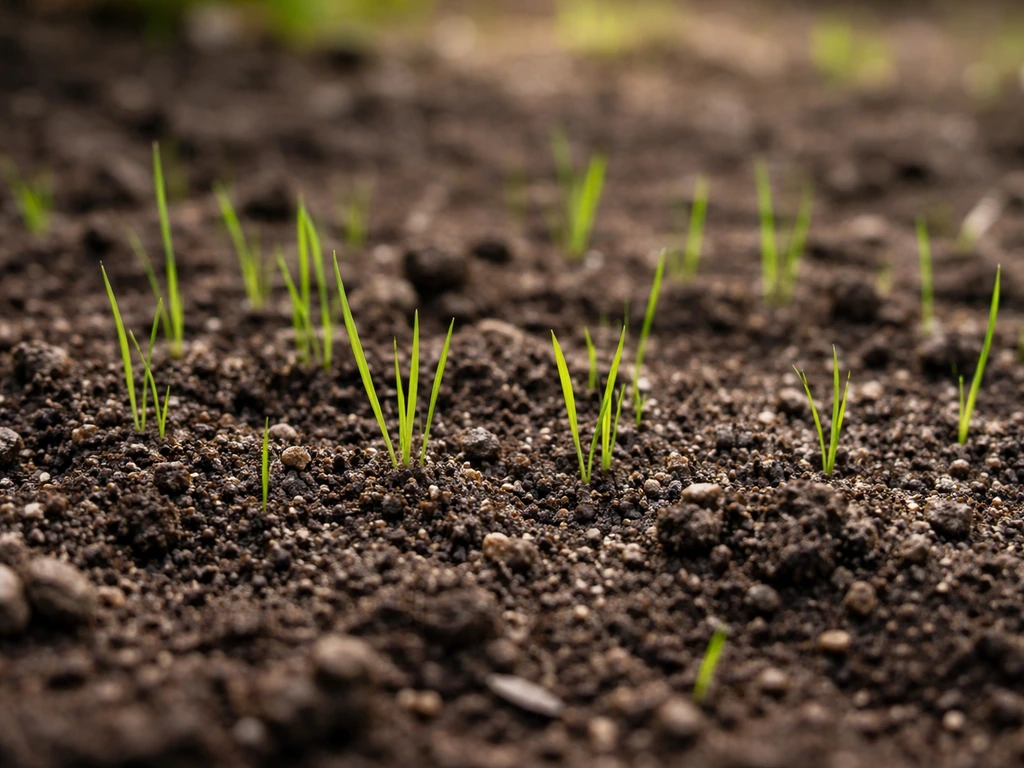
- Watch for sprouts (days 2 to 4): You'll start to see tiny white roots and then pale yellow-green shoots pushing up. Once the sprouts are about 1/2 inch tall and starting to turn green, it's time to uncover.
- Move into light: Remove the cover and move the tray to a bright windowsill or under grow lights. From this point on, the grass needs 10 to 12 hours of bright indirect light each day to grow thick and green rather than pale and leggy.
- Water once daily: After the cover comes off, water once in the morning by pouring water gently over the tray (or bottom-watering by setting the tray in a shallow dish of water for 10 minutes, then removing). Never let the tray sit in standing water for hours.
Light, temperature, and daily care for thick growth
The germination phase (days 1 to 3 or 4) is all about darkness and consistent moisture. Once the shoots emerge and turn green, the equation flips: now light becomes the most important factor. Aim for 10 to 12 hours of bright indirect light per day. A south- or east-facing windowsill in June is ideal. Avoid intense midday sun through south-facing glass in summer, it can overheat the tray and dry out the medium too fast.
Temperature matters too. Wheatgrass grows best between 60 and 75 degrees Fahrenheit. Most living rooms fall right in that range, so you probably don't need to do anything special. Avoid placing the tray on top of a heat source like a radiator or in a cold garage, both extremes slow germination and weaken growth.
Once the grass is up and green, your daily routine is simple: water once in the morning, check the catch tray and dump any standing water, and rotate the tray every day or two so all the blades get even light. That's genuinely all the care it needs. If you want decorative grass for more than Easter, the same wheatgrass tray method works well for seasonal centerpieces and year-round windowsill greenery That's genuinely all the care it needs.. Resist the urge to water more than once a day, more water does not mean faster growth, it means more mold risk.
How long it takes and when to trim or harvest
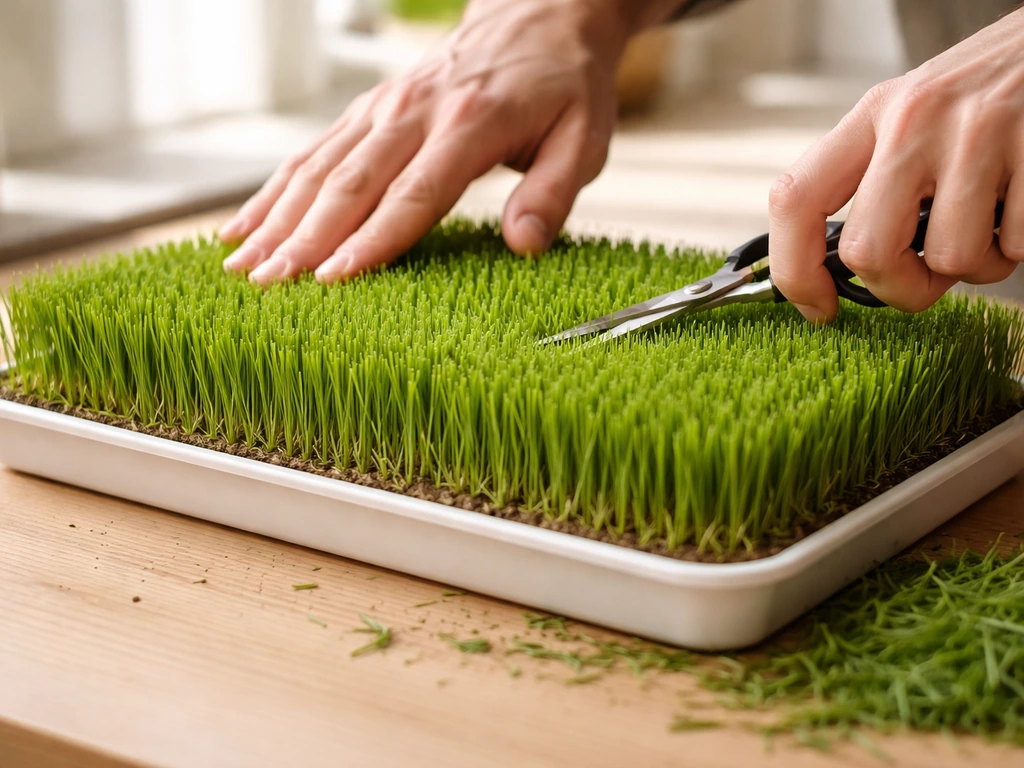
Here's the realistic timeline from seed to display-ready tray:
| Day Range | What's Happening | What to Do |
|---|---|---|
| Day 0 (tonight) | Dry seeds | Start soaking seeds in water |
| Day 1 | Seeds swollen, roots just starting | Plant in tray, cover, keep dark |
| Days 2 to 4 | Pale sprouts pushing up | Keep covered, mist if dry |
| Days 4 to 5 | Sprouts 1/2 inch, turning green | Uncover, move to bright light |
| Days 5 to 10 | Rapid green growth | Water once daily, rotate tray |
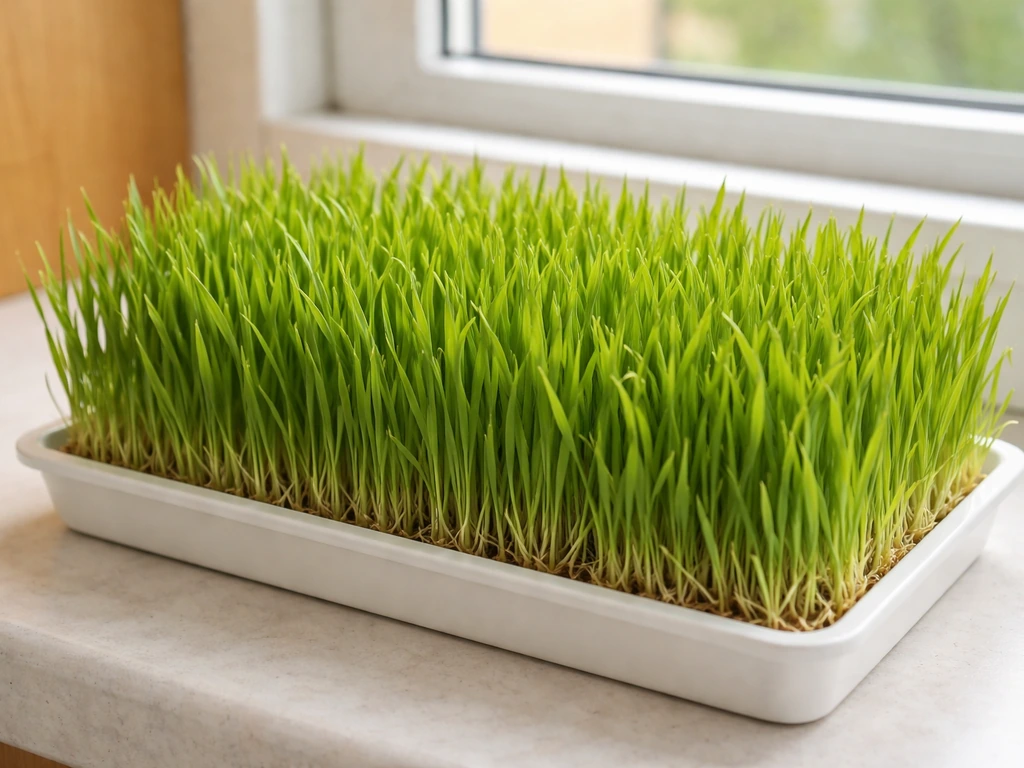
| Days 7 to 10 | Grass 3 to 4 inches tall | Ready for display |
| Days 10 to 14 | Grass 6 to 8 inches | Trim to desired height for basket/display |
For a basket display, grass looks best around 3 to 4 inches tall. If you want taller, more dramatic grass, let it grow to 6 to 8 inches before trimming. Cut with clean scissors close to the soil line if you want to harvest it, or just trim the tips to the height you like for display. After harvesting, the root pad can actually re-sprout for a second round of growth, though the second crop is usually thinner and patchier than the first.
Troubleshooting mold, uneven sprouting, and weak growth
Mold or white fuzz on the seeds or soil
This is the most common problem and it almost always comes down to too much moisture combined with not enough airflow. A few things to check: Are you draining the catch tray regularly? Is the growing medium soggy rather than just damp? Did you plant the seeds too densely? Dense seeding in a poorly draining medium with the cover on too long is the perfect recipe for mold. Fix it by removing the cover earlier (once you see the first sprouts), reducing watering frequency, making sure there's some air movement near the tray, and dumping any water that pools underneath. If the mold is mild and the grass is already growing, it often works itself out once you uncover and increase airflow. If it's severe, cut your losses and start a new tray.
Uneven or patchy sprouting
Patchy growth usually means uneven moisture during germination or uneven seed distribution. When you spread the seeds, take an extra minute to fill in bare spots. During the covered phase, check different areas of the tray, corners and edges tend to dry out faster than the center. Misting those spots individually during the germination phase helps. If some sections are ahead of others when you move to light, rotate the tray more frequently so the lagging areas catch up.
Leggy, pale, or weak growth
Tall, thin, yellowish blades that fall over instead of standing up straight are a classic sign of insufficient light. The grass is stretching toward whatever light it can find, which is called etiolation. Move the tray to a brighter spot or add a grow light set to 10 to 12 hours per day. You can also trim back the weakest blades to encourage the rest to thicken up. This principle is actually the same one behind why new lawn seedings get patchy in shade, without enough light, grass simply can't grow densely. If your home doesn't have a good sunny window, a basic LED grow light 6 to 8 inches above the tray solves the problem completely.
Seeds that didn't germinate at all
If nothing is sprouting by day 4 or 5, the most likely culprits are old or dead seed, seeds that dried out during the covered phase, or seeds that got too cold. Check the seed's age if you can, wheat berries store well but lose viability after a few years. Also make sure the tray isn't sitting somewhere below 55 degrees Fahrenheit. If germination was just slow rather than zero, be patient, it can take up to 7 days in cooler conditions.
Scheduling for Easter: timing plan and what to do after
Working backward from Easter Sunday
The key is knowing your target date and counting back 10 to 14 days. If you want taller, lush grass (6 to 8 inches), give yourself the full two weeks. If you just want a modest 3 to 4 inch display, 10 days is enough. For example, if Easter is on a Sunday, start soaking your seeds on the Wednesday or Thursday of the week before last. That gives you a comfortable buffer to slow things down (moving the tray somewhere slightly cooler) or speed things up (a warmer spot with more light) as needed.
| Easter Date Target | Start Soaking Seeds By | Expected Display Height |
|---|---|---|
| 14 days before Easter | Day 0 (today) | 6 to 8 inches by Easter |
| 12 days before Easter | Day 0 (today) | 4 to 6 inches by Easter |
| 10 days before Easter | Day 0 (today) | 3 to 4 inches by Easter |
| 7 days before Easter | Day 0 (today) | 1 to 2 inches (very young grass — possible but risky) |
If Easter is less than 10 days away, you can still try, germination and early growth can move faster in warm conditions. Eat Wheat’s Easter basket wheat grass activity page notes that wheat kernels should begin to sprout in about 7, 10 days, aligning the harvest-ready tray with a multi-day seed-to-sprout timeline Harvest Your Own Easter Basket Wheat Grass. But for a guaranteed full display, 12 to 14 days gives you the most control. It's better to have grass that's ready a couple of days early and just needs a trim than grass that's still barely sprouted when the holiday arrives.
What to do with the tray after Easter
The easiest option is composting. The root pad, growing medium, and any remaining blades all break down quickly in a compost pile or bin. If you don't have a compost setup, the whole tray can go into a yard waste bin in most municipalities. You can also try letting it re-sprout for a second crop, just keep watering and give it light. The second growth is usually thinner than the first, but it's still usable as pet grass or a windowsill green for another week or two. Cats and dogs love fresh wheatgrass, so if you have pets, the tray can move from Easter basket to pet corner without any changes.
One last thought: growing Easter grass is genuinely good practice for understanding seed germination principles that apply to real lawn work too. The same logic behind pre-soaking, consistent moisture, drainage, and light applies when you're seeding a bare spot in your yard or establishing a new lawn area from scratch. This is also a great foundation for learning how to grow ornamental grass, since many ornamental varieties share similar needs for consistent moisture early on and strong light for steady growth pre-soaking, consistent moisture, drainage, and light. The timelines are just much shorter with wheat in a tray, which makes it a great way to get your hands dirty before tackling a bigger outdoor project.
FAQ
How do I prevent mold if my room is humid or airflow is limited?
You want a medium that stays evenly damp, not wet. After you water, the tray should not sit with water pooling under the mat or medium for long. Dump any standing water from the catch tray each morning, and if the growing surface looks glossy or squishes when gently pressed, you are running too wet and should water less or check for better drainage.
What’s the best way to get a full, non-patchy tray (not just green in the center)?
For the thick, “basket-ready” look, aim to cover the entire tray surface with seed, don’t rely on a light scatter. If your tray has any bare patches, fill them in by adding a small pinch more seed to those spots (especially toward edges and corners, which often dry faster). Dense, even coverage matters more than adding extra water.
Can I use a grow light instead of a sunny windowsill, and how far should it be from the tray?
Yes, but do it gently. Once you see first sprouts and you are past the fully covered germination stage, you can add a small grow light set to 10 to 12 hours a day, keeping it about 6 to 8 inches above the tray. Increase light gradually over a day or two if the sprouts were already near a bright window, to reduce stress and uneven color.
My windowsill gets intense sun, will that hurt the Easter grass?
Overheating is a bigger issue than most people expect. If your tray sits in strong summer sun through a south-facing window, the medium can dry quickly and the grass can get thin and uneven. Move it back from direct midday glass, use bright indirect light, and rotate the tray daily or every other day so all sides get consistent exposure.
If I trim or harvest early, will the tray regrow for a second round?
If you harvest by cutting close to the soil line, the root pad often can re-sprout for a second round, but plan for a thinner, less uniform crop. Keep watering consistently and still provide strong light, and expect the second flush to take longer to “fill in” than the first.
My blades are yellow and falling over, what should I check first?
Thick, dark green blades come from staying in the right moisture and light rhythm. If blades turn yellow and bend over, it usually means too little light rather than “not enough nutrients.” Give it more bright indirect light or a grow light schedule first, then only adjust watering if the medium is clearly too wet.
What should I do if no seeds sprout by day 5?
If nothing sprouts by day 4 or 5, check seed age and temperature before changing everything else. Wheat berries and wheatgrass seed lose viability after a few years, and anything below about 55°F can slow germination substantially. Also confirm seeds were soaked overnight, and the medium stayed damp during the covered period.
How do I schedule my seed-soaking and planting so it’s ready at Easter (or a few days before)?
For display timing, count backward from your target date using the 10 to 14 day window. If you want 3 to 4 inches, plan closer to 10 days, if you want 6 to 8 inches, use closer to 14 days. Starting a couple days early is safer because you can always trim to height, but it is harder to fix a tray that is still barely sprouted on the day.
How often should I water once the grass is green, and when should I stop watering heavily?
For a tray you want to keep looking fresh, treat it like a living display. Water once in the morning, keep bright indirect light, rotate every day or two, and avoid soaking the medium late in the day. If you notice pooled water returning the next morning, your medium or drainage setup needs improvement, or you are watering too heavily.
Next Article
How to Grow Decorative Grass From Seed Step by Step
Step-by-step how to grow decorative grass from seed, including varieties, planting time, soil prep, sowing, watering, an