Growing St. Augustine sod comes down to three things done right: solid site prep before the pallets arrive, a strict watering schedule for the first three to four weeks, and enough patience to let the roots knit into the soil before you stress the lawn with mowing or fertilizer. Do those three things well and you'll have a dense, rooted lawn that looks like it's been there for years. For a more detailed walkthrough on the best way to grow St. Augustine grass long-term, review the full guide and tailor the schedule to your local conditions best way to grow st augustine grass. Skip any one of them and you'll spend the rest of the season chasing brown patches.
How to Grow St Augustine Sod: Step by Step Guide
Marcus Tillwell
21 May 2026
Sod vs. seed: what you're actually doing here
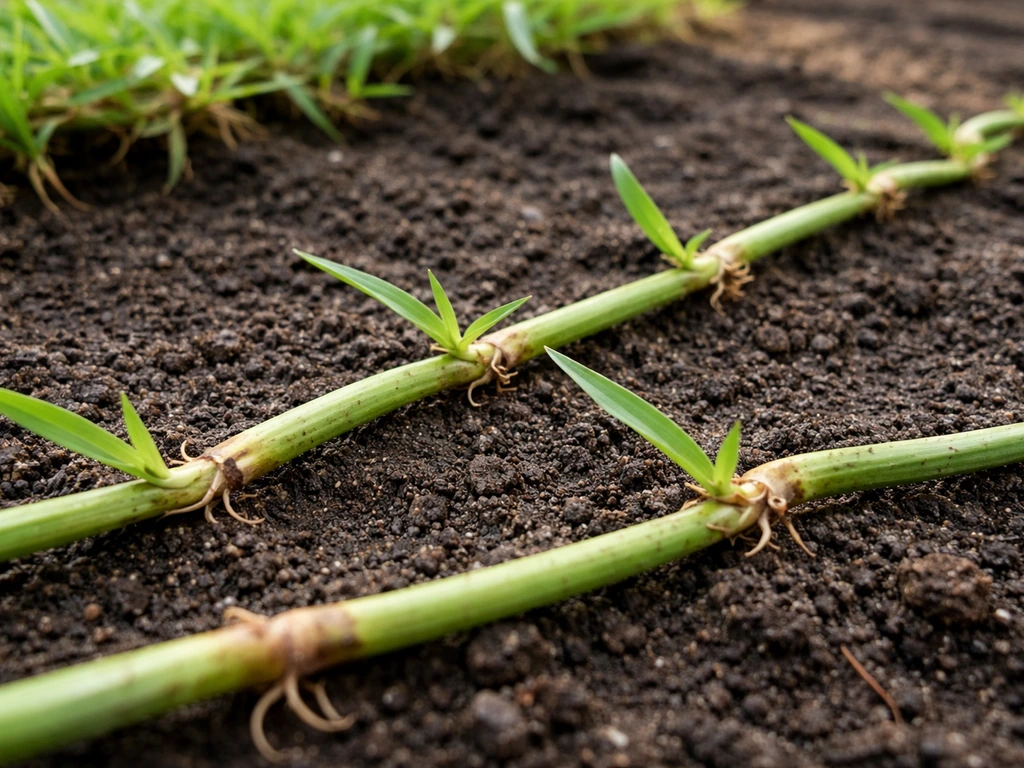
St. Augustine grass is propagated vegetatively, meaning it doesn't establish from seed the way bermuda or fescue does. Viable seed for home lawn use essentially doesn't exist for this species. That means sod (or plugs, or runners) is the standard approach, and it's actually the best one. Sod gives you an almost-instant lawn, dramatically reduces erosion on bare soil, and lets you walk on a finished-looking yard within weeks instead of months. The Alabama Cooperative Extension flat-out calls sodding the best and most common method for establishing St. Augustine, and they're right.
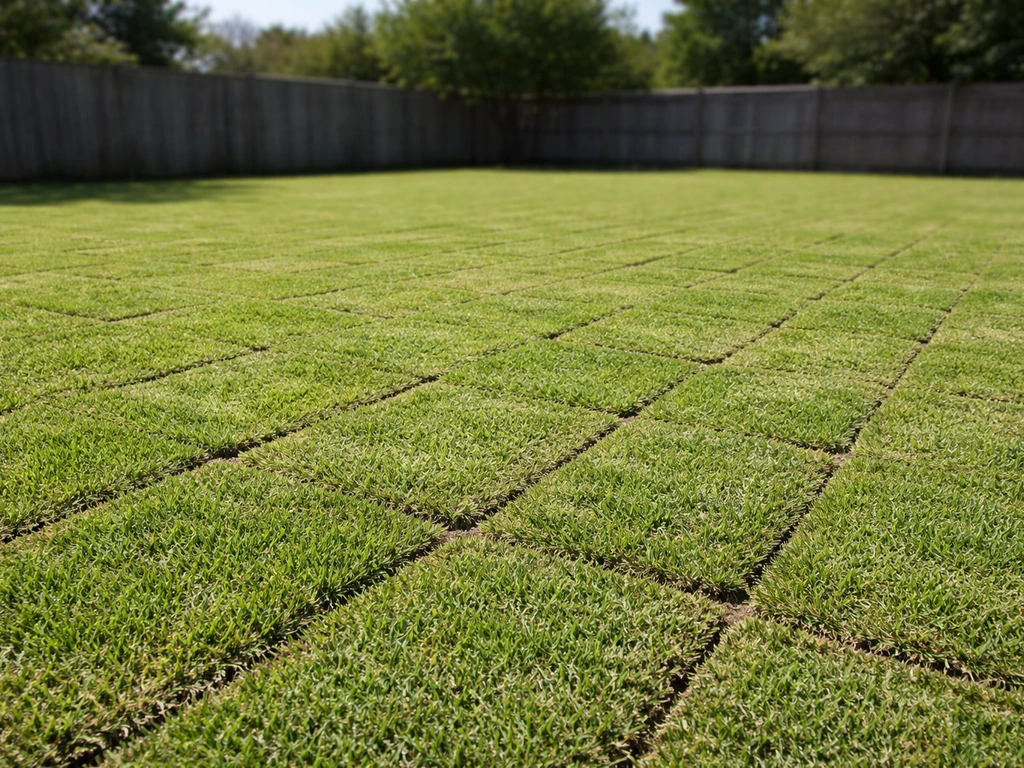
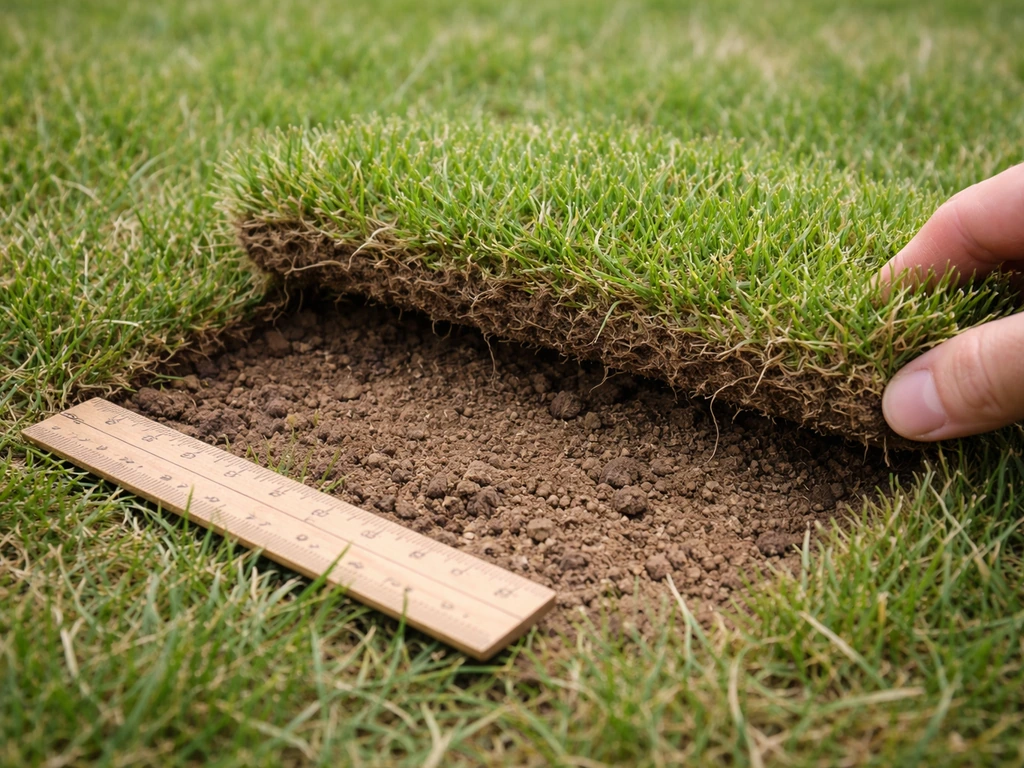
What success looks like at the end of establishment: your sod resists a firm tug (roots have anchored into the soil below), the grass is uniform in color without persistent yellow or brown sections, new lateral growth is visible at the edges of each piece, and you can mow it without pulling pieces loose. That typically happens in three to four weeks under good conditions. Your job until then is to keep the soil beneath each piece consistently moist and avoid anything that disrupts root contact.
If you're considering other methods, growing from plugs or runners are valid lower-cost alternatives, though they take significantly longer to fill in. If you specifically want to grow St. Augustine grass from plugs, focus on keeping the plug area consistently moist and avoid letting it dry out until the plugs knit in how to grow st augustine grass plugs. This guide focuses on full sod installation.
When to install: temperature windows and seasonal timing
St. Augustine is a warm-season grass that roots fastest when soil temperatures are consistently between 70 and 90 degrees Fahrenheit. In practical terms, that means late spring through early summer is your ideal window in most of its range (Florida, Gulf Coast, South Carolina coast, Texas, Southern California). In Florida and South Texas, you can install successfully from March through September. Farther north in the range (Alabama, Georgia, the Carolinas), stick to April through August for best results.
Avoid installing during cold snaps or when nighttime temperatures are dropping below 55°F regularly. The grass won't die, but root development slows dramatically and you'll find yourself watering a dormant slab of sod that just isn't knitting into the ground. If you're installing in fall (October or later in most zones), expect establishment to pause and resume in spring. You'll still need to water through the fall to prevent the sod from drying out and dying, even if it's not actively rooting.
Hot summer installs (90°F+ air temps) work fine but demand more frequent watering in the first week, sometimes twice a day in full sun. Plan your delivery for early morning and get the sod in the ground the same day it arrives. Sod left sitting on pallets in July heat starts dying within hours.
Site prep: the step most people rush
Good prep is what separates a sod job that roots in three weeks from one that struggles for three months. Don't skip this part.
Soil testing
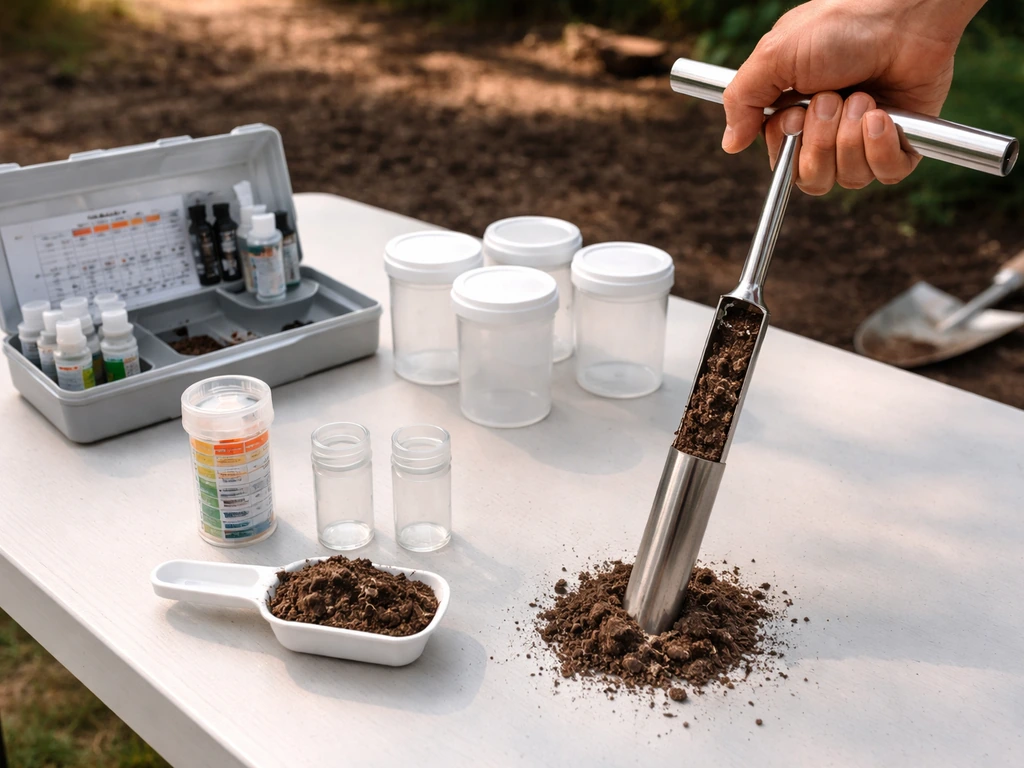
Get a soil test before you do anything else. St. Augustine prefers a soil pH of roughly 6.0 to 7.0. Outside that range, nutrients become unavailable no matter how much fertilizer you apply. Your county extension office offers tests for $10 to $20 and tells you exactly what to add. If your pH is low (acidic), you'll add lime. If it's high (alkaline), sulfur brings it down. The adjustment takes weeks to fully work, so do this at least a month before install day if you can.
Weed and old vegetation removal
Kill or remove everything growing in the area. A non-selective herbicide like glyphosate is the most thorough option. Apply it, wait 10 to 14 days, then rake out the dead material. For large areas, a sod cutter rental (around $75 to $150 per day) removes old turf fast. Don't just lay sod over existing weeds or old grass. They'll push through the seams and undermine your new lawn within weeks.
Grading and leveling
The soil surface needs to be level and slope gently away from your house (about a 1 to 2 percent grade). Low spots collect water and cause fungal problems or rot in new sod. High spots dry out too fast. Rake the area thoroughly, fill low spots with topsoil, and firm everything down by walking over it or using a lawn roller. After grading, the soil surface should sit about 1 inch below adjacent sidewalks, driveways, and edging so your finished lawn height ends up flush.
Soil conditioning by type
If your soil is heavy clay, till in 2 to 3 inches of coarse sand and compost to improve drainage. Clay holds water too long and suffocates roots, especially in those first critical weeks. If your soil is sandy (common in Florida and coastal areas), work in compost to improve water retention. Sandy soil drains so fast that new sod can dry out between waterings. Either way, you want a loose, workable top 4 to 6 inches that roots can push into easily. After any amendments, re-rake to level and lightly firm again.
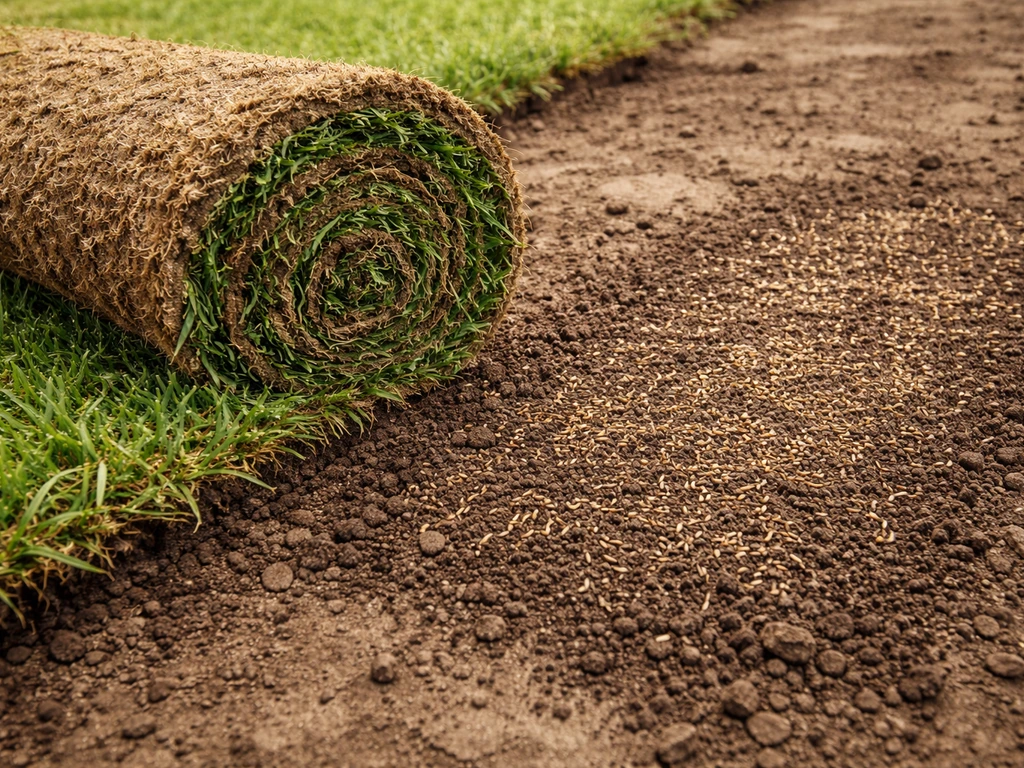
How to lay St. Augustine sod the right way
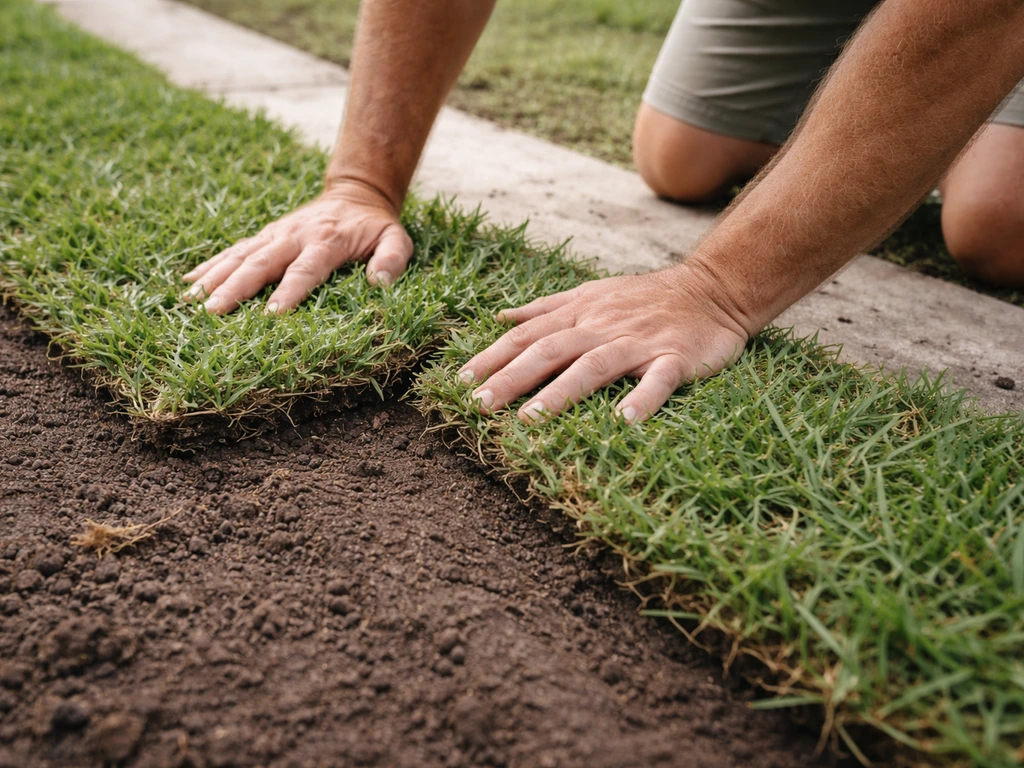
Moisten the soil the day before installation, not the day of. You want damp but not muddy. Then get moving as soon as your sod arrives.
- Start along a straight edge: a sidewalk, driveway, or string line. Lay the first row in a straight line and work from there.
- Stagger the seams like brickwork. Never line up vertical seams in adjacent rows. Offset each row by at least half a piece to prevent erosion channels and weak spots.
- Push pieces tightly together with no gaps. Gaps dry out fast, weeds move in, and you end up with permanent brown lines. Butt the edges firmly against each other.
- Cut pieces to fit edges and curves using a sharp utility knife or a half-moon edger. Don't fold or overlap pieces.
- Roll the entire installation after laying with a lawn roller (rentable for $30 to $50). This presses the sod firmly into soil contact, which is critical for rooting. Air pockets under pieces prevent roots from anchoring.
- On slopes, lay sod horizontally across the slope, not up and down. On steeper slopes (over 30 degrees), stake each piece with biodegradable sod staples to prevent sliding before roots establish.
Sun and shade note: St. Augustine needs at least 4 to 6 hours of direct sun for most varieties. If you're installing in shadier spots, look for shade-tolerant cultivars like Seville or Captiva. Even those won't thrive in deep shade under a dense canopy. If the area gets less than 3 hours of direct sun, St. Augustine is going to struggle regardless of how well you install it.
Watering schedule from day one through full establishment
Water is everything in the first four weeks. The goal is to keep the top 1 to 2 inches of soil beneath the sod consistently moist, not soggy, not dry. For uniform establishment, UGA’s “Lawns in Georgia” guidance emphasizes keeping the upper 1 to 2 inches of soil moist (not wet) and then reducing irrigation frequency while increasing the applied amount as roots establish blank" rel="noopener noreferrer">upper 1 to 2 inches of soil consistently moist. Letting it dry out even once in the first week can kill a section. Here's how to run it by phase.
| Phase | Timing | Watering Frequency | Amount / Goal |
|---|---|---|---|
| Immediate post-install | Day 1 | Water within 30 minutes of laying each section | Soak through sod and into top 2 inches of soil |
| Week 1 | Days 2-7 | 2 to 3 times per day in hot weather, at least once daily in mild weather | Keep soil beneath sod visibly moist when you lift a corner |
| Week 2 | Days 8-14 | Once daily, early morning | Top 1-2 inches of soil stays damp between waterings |
| Weeks 3-4 | Days 15-28 | Every other day, shifting to deeper, longer sessions | Encourage roots to chase water deeper; reduce surface moisture |
| After rooting | Day 28+ | As needed based on rainfall and temperature | Transition to regular lawn irrigation schedule |
To check whether you've watered enough, lift a corner of a sod piece and press your finger into the soil. It should feel damp, like a wrung-out sponge. If it's dry or dusty, you're not watering enough. If water is pooling on the surface or squishing underfoot, back off. Overwatering is just as damaging as underwatering and is the number one cause of fungal problems in new sod.
If you have an irrigation system, run it for shorter cycles spread across the day in week one, then consolidate to one deep morning run starting in week two. Morning watering reduces fungal risk because the grass has time to dry before evening. Avoid watering at night if you can help it.
Mowing, fertilizing, and weed control during establishment
First mow
Don't mow until the sod has rooted enough that it resists a firm tug without lifting. For most installs, that's somewhere between 10 and 21 days depending on temperature and conditions. The first mow should be at the high end of St. Augustine's recommended height range, which is 3.5 to 4 inches. Set your mower high and take off no more than one-third of the blade height at a time. Mowing too short too soon stresses the plant at exactly the moment it needs energy to push roots down. Walk carefully, especially around seams.
Fertilizing
Hold off on fertilizer for the first 30 to 60 days. Sod is already stressed from being cut, transported, and transplanted. Pushing it with nitrogen before roots establish can burn the grass and stimulate top growth at the expense of root development. After 30 days (or when you're confident the lawn has rooted), apply a starter fertilizer or a balanced lawn fertilizer with a moderate nitrogen level. Once established, St. Augustine is a moderate to heavy feeder. In active growing season (late spring through summer), fertilize every 6 to 8 weeks with a nitrogen-heavy fertilizer. Reduce or eliminate fall applications in frost-prone areas.
Weed control
Avoid pre-emergent herbicides for at least 60 days after install. They can interfere with root establishment. For weeds that pop up in the seams in the first few weeks, pull them by hand. After 60 days, once you've confirmed solid establishment, you can apply herbicides labeled for St. Augustine (always check the label, because some herbicides that are fine on other grasses will damage St. Augustine). Atrazine is one of the most commonly used options for this species, but read your state's restrictions before applying it. Do not use any broad-spectrum herbicide on your new lawn.
What can go wrong and how to fix it
Brown patches or pieces that won't green up
The most common cause is air gaps under the sod. If a piece looks brown while its neighbors are greening, lift it, check for dryness underneath, water the soil, press the piece back down firmly, and roll or tamp it. Sometimes a piece just got missed during rolling. Another cause is sod that dried out on the pallet before installation. You can still save pale or slightly dried sod by getting it in the ground quickly and soaking it thoroughly, but fully brown, brittle sod won't recover.
Patches that simply won't root
If a section stays loose and won't knit after four weeks, pull it up and look at the soil. Compacted, dry, or poorly prepared soil is usually the culprit. Loosen the soil, amend if needed, water the area, lay a fresh piece of sod, and roll it thoroughly. Buy a few extra square feet of sod when you order originally so you have it for patch repairs without waiting for a second delivery.
Fungal issues (gray leaf spot, brown patch)
New St. Augustine is susceptible to gray leaf spot and brown patch, especially when it's staying wet overnight. Symptoms include circular brown or tan patches, lesions on blades, and a bleached-out appearance. If you see fungal activity, cut back nighttime watering immediately and switch fully to morning irrigation. In severe cases, apply a fungicide labeled for St. Augustine. Avoid over-fertilizing with nitrogen during a fungal outbreak, as it feeds the disease. Improving air circulation by mowing at the correct height also helps.
Runoff and pooling during irrigation
If water runs off before soaking in, your application rate is too fast for the soil to absorb. Break your irrigation into two shorter cycles with a 30-minute break in between (called cycle-and-soak). The first cycle wets the surface, the break lets it begin absorbing, and the second cycle pushes moisture deeper. This is especially effective on clay soils and slopes.
Slow or uneven establishment in shaded areas
Shaded sections always root more slowly. Don't increase watering in those areas to compensate; instead, be patient and make sure you're using a shade-tolerant cultivar. If a heavily shaded section simply refuses to establish after 6 to 8 weeks, ground cover or mulch may be a more realistic solution than grass.
Your first 60 days: a practical timeline
| Milestone | What to do | What success looks like |
|---|---|---|
| Day 1 | Lay sod, roll entire area, water thoroughly within 30 minutes | Sod is flat, firmly in contact with soil, surface is moist |
| Days 2-7 | Water 2-3x daily in heat, check soil moisture under sod daily | Soil under sod stays damp; sod is green and pliable |
| Days 7-14 | Reduce to once daily watering; check if sod resists tug | Sod begins to resist light tug; color is uniform green |
| Days 14-21 | First mow if sod is rooted; mow high at 3.5-4 inches | Mower passes without lifting sod; no loose pieces |
| Days 21-30 | Shift to every-other-day watering; increase watering depth | Lawn feels firm underfoot; new lateral growth visible at seams |
| Days 30-60 | Apply first fertilizer; hand-pull weeds in seams; evaluate patches | Fully rooted lawn; uniform color; dense lateral spread beginning |
How to know you're rooted and ready for normal care
The tug test is the simplest and most reliable check. Grab a piece of sod with both hands and pull upward firmly. If it lifts cleanly, it's not rooted. If it resists and you feel resistance from the soil, roots have anchored. Do this in several spots across the lawn, including areas that get more shade or looked slower to establish. Once the whole lawn passes the tug test, you're in establishment territory.
According to UF/IFAS, full establishment typically happens in three to four weeks under good warm-season growing conditions. After that point, you can shift from daily irrigation to watering only as needed based on rainfall and temperature. Most St. Augustine lawns in the Southeast need about 3/4 to 1 inch of water per week during the growing season.
Ongoing care after establishment
Mowing long-term
Keep St. Augustine at 3 to 4 inches for most situations. Shade-grown lawns do better at the top of that range (4 inches) because more leaf surface captures limited light. Never scalp it below 2.5 inches. Mow often enough that you're never removing more than one-third of the blade at a time. During peak growing season in summer, that might mean mowing once a week. Keep your mower blades sharp to avoid tearing the wide blades of St. Augustine, which shreds rather than cuts cleanly with dull blades.
Fertilizing through the seasons
In the active growing season, feed every 6 to 8 weeks with a nitrogen-heavy fertilizer (something like a 16-4-8 or similar). In late summer (about 6 to 8 weeks before your first expected frost if you're in a frost-prone area), stop fertilizing with nitrogen to allow the grass to harden off naturally before cooler temps. In warm, frost-free zones like South Florida, you can maintain a year-round fertilization schedule scaled back slightly in cooler months.
Thatch management
St. Augustine is a prolific grower and builds thatch (a layer of dead organic matter above the soil) fairly quickly. Check thatch depth annually. If it exceeds about 1/2 inch, dethatch or verticut in late spring. Heavy thatch blocks water and fertilizer from reaching the soil and is a refuge for insects and disease.
Seasonal transitions
In frost-prone areas, St. Augustine goes dormant and turns tan in winter. This is normal. Reduce or stop irrigation during dormancy unless you're experiencing drought. Do not fertilize dormant grass. Resume your full care program in spring once soil temps return above 60°F and the grass starts greening up on its own. Early spring is also the right time for pre-emergent herbicide application to prevent summer weeds before they germinate.
FAQ
How long can I leave St. Augustine sod sitting on pallets before installing it?
Don’t treat it as a multi-day storage plan. In hot weather, sod can start dying within hours after being cut and stacked. If delivery timing is tight, keep pallets shaded, cover them to reduce heat stress, and get the pieces into the ground the same day whenever possible.
What’s the best way to handle gaps or seams between sod pieces?
Aim for tight, staggered joints, then press each seam firmly as you go. After installation, use a lawn roller or tamping block over the seams to remove air pockets. If you notice a gap that stays open, lift the edge, add a thin layer of soil so it sits flush, then re-lay and roll again.
Should I water immediately after laying St. Augustine sod?
Yes, but first ensure the ground is already damp from the day before. Once laid, start with enough irrigation to moisten the top 1 to 2 inches beneath the sod, then follow your phase schedule. Avoid “sprinkling,” which wets the surface and encourages shallow rooting and fungal risk.
How can I tell if my irrigation schedule is causing fungus or problems?
Watch for signs like persistent dampness at night, circular tan or brown patches, or a bleached look that spreads. If it coincides with evening watering, switch to a morning schedule immediately and stop overwatering. Keep fertilizer on hold during the early rooting window, since excess nitrogen can worsen outbreaks.
What if my area slopes or has a low spot near the house?
Prioritize grading so water moves gently away from foundations, a 1 to 2 percent slope. Low spots are the most likely to stay wet and rot the sod, so fill them with topsoil, re-level, and firm before you lay any pallets. If you can’t correct drainage easily, consider adding a different ground surface solution in the worst pocket.
Can I install St. Augustine sod in partial shade, like under a patio or tree canopy?
It can work only if the area gets at least 4 to 6 hours of direct sun for most varieties. For less sun, choose shade-tolerant cultivars, but deep shade often results in slow rooting and patchiness even with perfect installation. If it regularly drops below about 3 hours of sun, grass may be the wrong long-term solution.
Do I need to compact the soil after grading, or will that hurt rooting?
You want firm contact, not a hard pan. Walk over the area or lightly roll so the sod sits flush without rocking. If the soil is very clay-heavy, avoid over-compacting. The goal is stable, level contact that helps roots anchor quickly.
Is it okay to fertilize right after installation if the sod looks pale?
Usually no. Early fertilization can stress sod and push top growth before roots knit. If you see pale color, check watering first and confirm the sod is still moist beneath it. Plan fertilizer only after the rooting window (commonly 30 to 60 days) or once the lawn resists a tug.
When is it safe to mow St. Augustine sod, and how should I mow?
Mow only after it resists a firm tug without lifting pieces, often 10 to 21 days depending on conditions. Start at the high end of the recommended height range (around 3.5 to 4 inches), and remove no more than one-third of the blade. Walk carefully near seams so you don’t disturb root contact.
What should I do if one section stays brown while other areas green up?
Lift the sod corner and check the soil underneath. Dry soil under a section is a common cause, along with missed rolling that left an air gap. Re-water the area, press the sod back down firmly, and re-tamp or roll. If the sod is fully brown and brittle, it likely won’t recover and should be replaced.
How do I spot early watering problems like under- or overwatering?
Underwatering leaves the soil dry beneath the sod, it should feel damp like a wrung-out sponge when you press your finger into the top 1 to 2 inches. Overwatering often creates pooling, keeps the base wet for too long, and increases fungal risk. Adjust by changing run time and using cycle-and-soak on slopes or clay to improve absorption.
Can I use weed control before the sod roots, especially for weeds in seams?
Avoid pre-emergent herbicides for at least 60 days after installation, since they can interfere with establishment. For weeds that already popped up in seams during the early period, hand-pull is the safest option. After the lawn is established, use only herbicides labeled for St. Augustine and follow the label carefully.
What’s the quickest way to troubleshoot “won’t knit” areas after 4 weeks?
Do a root-contact check and look for the likely causes: compacted soil, dryness, or incomplete site prep. Lift a small section, evaluate moisture and soil texture, loosen or amend as needed, then re-lay fresh sod and roll thoroughly. Also confirm you ordered extra square footage so patching doesn’t stall your project.
If my soil pH is off, how long before installation should I amend it?
Plan at least a month ahead. Lime or sulfur adjustments take time to fully react, and nutrient availability suffers when pH is out of the target range. A soil test before you begin lets you correct the right thing instead of repeatedly applying fertilizer that can’t be used by the grass.
What should I do during winter dormancy in frost-prone areas?
Tan color and reduced growth are normal. Reduce or stop irrigation unless you’re in a drought, and do not fertilize dormant grass. Resume the full schedule in spring once the lawn greens up and soil temperatures rise above about 60°F.
Next Article
How to Grow St Augustine Grass From Runners Step by Step
Step-by-step guide to grow St Augustine grass from runners, with timing, spacing, watering, and troubleshooting for root