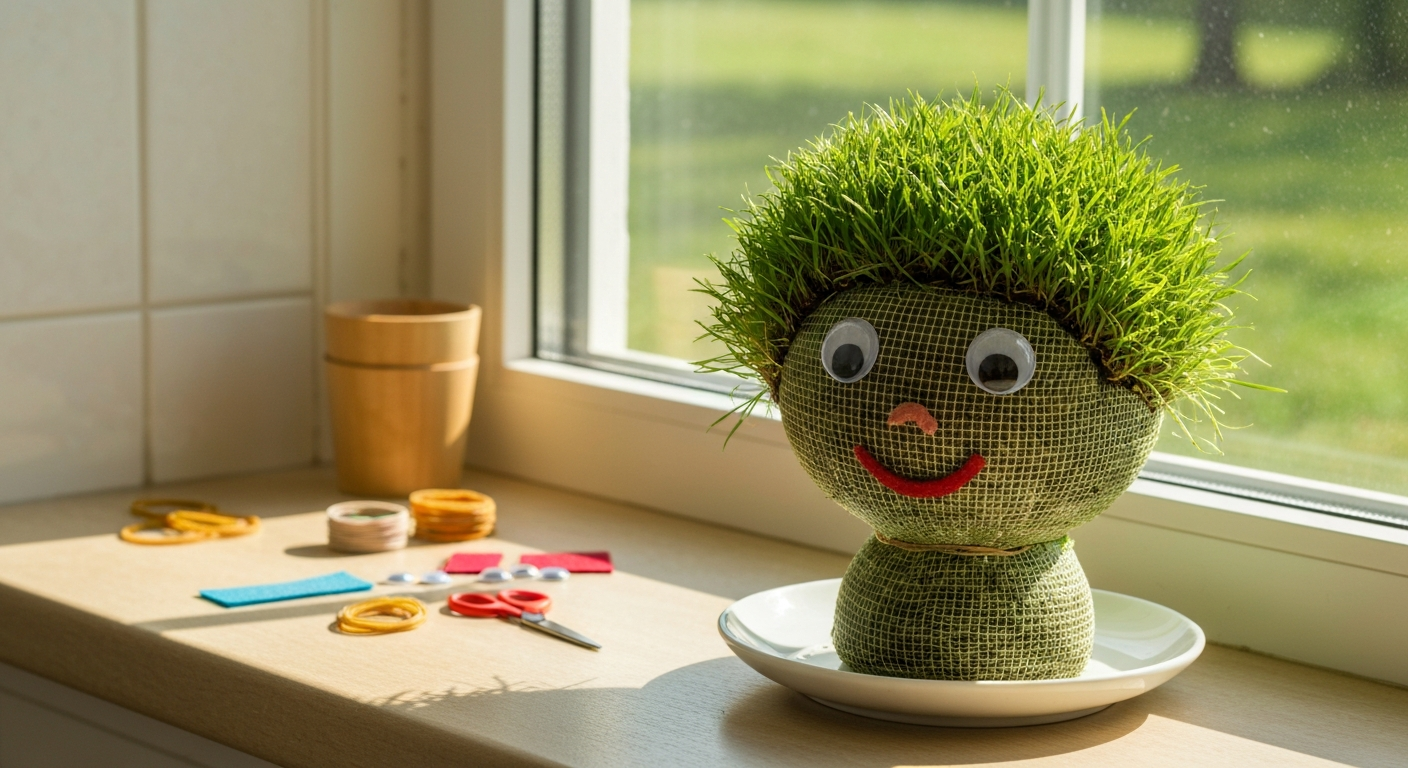
To grow a grass head doll, fill a nylon stocking with a moist seed-starting mix and grass seed, tie it off into a head shape, decorate it as a face, and place it on a sunny windowsill. Keep the medium damp, and you will see green sprouts pushing through the stocking fibers in as little as 4 to 7 days, depending on which seed you choose. Annual ryegrass, wheatgrass, and quick-germinating fescues are the go-to picks because they sprout fast, grow dense, and produce the lush 'hair' that makes the project so satisfying for kids and crafters alike.
How to Grow Grass Head Doll: Seeds, Care & Styling Tips
Marcus Tillwell
23 Jul 2026
What exactly is a grass head doll?
A grass head doll (also called a grow head, grass head, or angel grass) is a simple craft container shaped and decorated to look like a face or character, with live grass growing from the top as 'hair.' The basic concept has been sold in kit form for decades and is a staple children's activity in schools, craft stores, and holiday settings. The craft works because grass seeds are tiny, germinate quickly, and send shoots up through the mesh or fabric of the container within days. Once the grass is a few centimeters tall you can trim it into hairstyles, add googly eyes, or go as creative as you like with paint and accessories.
The name varies by region and seller. In Australia and the UK it is often called a 'grow head' or 'grass head.' In some craft circles and on seed packets it shows up as 'angel grass,' which refers to the same concept. Some tutorials and related projects labeled 'anima grass' or 'Easter grass' also use the same growing method, just packaged for different occasions. If you have landed here looking for one of those, you are in exactly the right place.
Quick disambiguation: angel grass, anima grass, Easter baskets, and grasshoppers
If you searched for 'how to grow angel grass' or 'how to grow anima grass,' those terms overlap heavily with grass head dolls and the instructions in this guide apply almost entirely. The core technique is the same: a stocking or container filled with a growing medium, seeded heavily, kept moist, and grown indoors. The same fastest seed choices (annual ryegrass and wheatgrass) apply to all of those projects. The guide on how to grow grass heads covers the standalone head-shaped version in more detail if you want a pure tutorial for that format.
If you searched 'how to grow grass for Easter baskets,' that is a closely related project using a shallow tray or the Easter basket itself as the container, but the seeding and care steps are nearly identical. That variant gets its own section later in this article. One search that lands people here but belongs somewhere else entirely is 'how to grow grasshoppers.' Grasshoppers are insects, not plants, and raising them involves completely different resources focused on insect husbandry and pest management. That topic is outside the scope of this lawn and craft seed guide.
Everything you need before you start: the materials list
This list is intentionally practical and budget-friendly. You likely have several items already at home, and the rest are available at a hardware store, garden center, or online. Quantities below are calibrated for making two to three standard-sized grass head dolls (roughly tennis-ball size each).
- One pair of sheer nylon stockings or pantyhose (the thinner the mesh, the better the sprout coverage; knee-high stockings work well for single heads)
- Approximately 2 to 3 cups of seed-starting mix or peat-based potting medium (sterile and soilless; do not use garden soil indoors)
- 1 to 2 tablespoons of perlite and 1 tablespoon of vermiculite to mix into the medium for drainage and moisture retention
- 2 to 3 tablespoons of fast-germinating grass seed per head (see seed options in the next section)
- A shallow saucer, yogurt pot lid, or small container to rest the head on and catch water
- Craft supplies for decoration: googly eyes (self-adhesive or glue-on), craft foam or felt for facial features, non-toxic paint or markers for drawing on the stocking
- A small spray bottle for misting (or a saucer for bottom-watering)
- Rubber bands or twist ties to seal off the stocking and create the head shape
- Optional: small scissors with rounded tips for trimming the grass hair once it grows
- Optional: a small grow light or positioning near a south- or east-facing window that receives at least 4 to 6 hours of bright indirect light daily
One tip I have learned the hard way: do not skip the perlite. Straight peat or coco coir holds water beautifully but can go anaerobic and musty in an enclosed stocking if you overwater. The perlite keeps air pockets in the mix, which matters a lot inside a sealed nylon tube.
The fastest seeds for grass head dolls and why they work
Seed choice is the single biggest factor in how quickly you see results. The three best options for this project are annual ryegrass, wheatgrass (hard red wheat berries), and quick-germinating turf fescues. Each has a different sweet spot.
Annual ryegrass
Annual ryegrass (Lolium multiflorum) is the workhorse of this project. Under favorable indoor conditions it typically emerges in 5 to 10 days, and it will sprout at surprisingly cool temperatures. Extension research from Cornell shows it can germinate as low as 36°F (2°C), though it moves fastest at moderate cool-season temps in the roughly 50 to 77°F (10 to 25°C) range. That flexibility means it works in a cool classroom or a warm kitchen. The seed is cheap, widely available in lawn and cover-crop mixes, and produces upright green blades that look great as doll hair.
Wheatgrass
Wheatgrass (Triticum spp., sold as hard wheat berries or cat grass seed) is arguably the fastest option of all. If you soak the seeds for 8 to 12 hours before planting, you can see tiny sprouts as early as 2 to 4 days after seeding. Harvestable, inch-long blades of green hair typically appear within 7 to 12 days indoors. The trade-off is that wheatgrass is a cereal grain, so its blades are slightly wider and coarser than lawn grass. For kids who want fast results, though, nothing beats it. Pre-soaking is the key step: put the wheat berries in a cup of water overnight before you fill the stocking head.
Quick-germinating fescues
Turf-type tall fescue and hard fescues typically emerge in 5 to 12 days under good moisture and temperature conditions, with optimal germination happening when the growing medium is kept in the 68 to 86°F (20 to 30°C) range. Turf‑type Tall Fescue, Iowa State Extension (Yard and Garden) notes turf‑type fescues commonly emerge in about 5–12 days under moist, warm seed‑zone conditions and that germination slows when soil temperatures drop below roughly 50°F (10°C) Turf‑type Tall Fescue — Iowa State Extension (Yard and Garden). Fescue produces finer blades than wheatgrass and a lush, dense mat of green that looks very natural as doll hair. The caution with fescue is that germination stalls noticeably if the temperature drops below 50°F (10°C), so if your space runs cool, annual ryegrass or wheatgrass is a safer first choice.
| Seed type | Expected emergence (days) | Min. germination temp | Best for | Notes |
|---|---|---|---|---|
| Annual ryegrass | 5 to 10 days | ~36°F / 2°C | Cool rooms, classrooms, fast results | Cheapest option; widely available |
| Wheatgrass (hard wheat berry) | 2 to 4 days (pre-soaked) | ~50°F / 10°C | Fastest results, kids' projects | Pre-soak 8 to 12 hours; wider blades |
| Turf-type tall fescue | 5 to 12 days | ~50°F / 10°C | Fine hair texture, denser look | Slow if temperature drops below 50°F |
| Perennial ryegrass | 5 to 10 days | ~41°F / 5°C | Mild-temp indoor rooms | Very similar to annual ryegrass for this use |
Timing by occasion and regional considerations
If you are making a grass head doll for Easter, start it 10 to 14 days before the holiday. Wheatgrass will be lush and fully grown by day 10 to 12 if your space is warm enough (65°F or above indoors). Annual ryegrass gives you a little more buffer, since it is forgiving of cooler conditions in early spring homes. In 2026, Easter falls on April 5, so aiming for a March 22 to 24 start date gives you comfortable lead time.
For classroom projects or birthday gifts, start the head 7 to 10 days before the presentation date if you are using wheatgrass, or 10 to 14 days out if you are using ryegrass or fescue. Regional indoor temperatures matter here more than outdoor climate, since this is an indoor craft. If you are in a colder climate (Minnesota, Canada, northern UK) and your home runs below 60°F in winter, lean toward annual ryegrass over fescue because ryegrass's cold-tolerance advantage is genuinely useful in those conditions. If you are in a warm or humid climate (Gulf Coast, tropical regions), watch for mold more carefully and prioritize ventilation.
Step-by-step: building the grass head
- Lay a knee-high nylon stocking flat on your work surface. If using pantyhose, cut one leg off just below the waistband.
- Add 1 to 1.5 tablespoons of your chosen grass seed (pre-soaked if using wheatgrass) to the bottom of the stocking first. The seed goes in first so it ends up near the outside of the ball, directly against the mesh, where it can germinate and push through.
- Mix your seed-starting medium: roughly 2 parts peat or coco coir, 1 part perlite, 1 part vermiculite. Moisten it until it clumps when you squeeze a handful but does not drip.
- Spoon or pour the moist medium on top of the seed until the stocking is roughly the size of a tennis ball or small orange. Pack it gently as you go to push the seed against the mesh wall.
- Twist the stocking tightly just above the packed ball and tie it off with a rubber band or knot. Snip off any excess nylon above the tie if you want a cleaner look.
- Shape the ball with your hands to round it out. Squeeze and roll gently to ensure the seed is distributed evenly just under the stocking surface.
- Sit the head on a small saucer or plastic lid. This is the 'base' that keeps it upright and will catch water.
- Decorate now, before the hair grows: press or glue on googly eyes, draw a nose and mouth with a marker, cut felt ears or a hat, or paint directly onto the stocking with non-toxic fabric paint.
Step-by-step: sowing seeds and the first 48 hours
The seed is already inside the stocking if you followed the steps above, but the first 48 hours of setup matter a lot for germination success. Here is what to do immediately after assembly.
- Give the entire head a thorough initial soak by sitting it in a bowl of room-temperature water for 10 to 15 minutes. Let it absorb moisture fully, then lift it out and let excess water drip off for a minute before placing it on its saucer.
- Place the head on a windowsill that gets bright indirect light or direct morning sun. A south- or east-facing window is ideal indoors. Avoid intense afternoon direct sun in summer as it can dry the stocking out too quickly.
- For the first 2 to 3 days, keep the environment slightly humid. You can loosely drape a clear plastic bag over the head (without sealing it) to retain moisture, similar to a mini greenhouse. Leave a gap for some air circulation to prevent mold.
- Mist the surface of the stocking once or twice a day with a spray bottle. You want the outer mesh to feel cool and just damp to the touch, not sopping wet. Alternatively, add a small amount of water to the saucer each day and let the head wick moisture up from below.
- Maintain room temperature of 65 to 75°F (18 to 24°C) for fastest results. If your space is cooler (below 60°F / 15°C), germination will still happen but it will take a few days longer.
- Remove any plastic covering once you see the first green tips emerging, usually around days 3 to 5 for wheatgrass and days 5 to 7 for ryegrass.
What to expect day by day: germination timelines
Here is an honest, realistic timeline for what you will see. These are based on indoor conditions at around 68 to 72°F (20 to 22°C) with daily misting.
| Day | Wheatgrass | Annual ryegrass | Fescue |
|---|---|---|---|
| Days 1 to 2 | Seeds swell; tiny white root tip visible through stocking | Seeds swell; no visible shoot yet | Seeds swell; no visible change outside |
| Days 3 to 4 | Pale yellow-green shoots pushing through mesh | First tiny green tips may appear | No visible change yet (normal) |
| Days 5 to 6 | Bright green blades 1 to 2 cm tall | Green shoots clearly visible, 0.5 to 1 cm | First green tips emerging |
| Days 7 to 10 | Full 'hair' 3 to 5 cm tall; head looks lush | Hair 2 to 4 cm; coverage filling in | Shoots 1 to 2 cm; growing quickly now |
| Days 10 to 14 | Ready for first trim; may need daily watering | Full hair effect achieved; trim ready | Dense, fine hair 3 to 4 cm; full effect |
| Week 3 onward | Second flush after trimming; replant if browning | Steady growth; trim every 5 to 7 days | Very consistent grower; trims well |
The biggest thing I tell people who are impatient at day 4 with nothing visible: do not assume it has failed. The root system establishes itself before the shoot breaks surface. If the medium feels moist and the temperature is right, something is almost certainly happening inside. The moment you see the first few green threads poke through, the rest follows surprisingly fast.
Trimming, styling, and keeping the hair healthy
Once the grass reaches about 5 to 7 cm (roughly 2 to 3 inches), it is ready for its first haircut. Use small scissors to snip the tips back to around 2 to 3 cm. Regular trimming actually encourages denser growth by preventing the grass from using all its energy on height rather than tillering (sending up new shoots). Think of it like a lawn: regular mowing makes it thicker, not thinner.
For styling, you can part the grass, shape it into a mohawk, flatten it into a side part, or use a little water to slick it into spikes. Kids love using toy comb accessories or pipe-cleaner headbands. If you want to add a hat or accessory that sits on the grass, attach it after each trim so it does not flatten or mat the growth.
Watering after the initial setup should stay consistent but moderate. Mist the surface once daily, or place a small amount of water in the saucer every other day. The goal is for the stocking surface to feel cool and slightly damp, never soaked through and dripping. If the head feels very light and the nylon looks dry, it needs water. If it feels heavy and smells earthy or sour, you have been overwatering and should let it dry out slightly before the next water.
For feeding, the seed-starting mix contains very little nutrition, which is fine for a short-term project. If you want to extend the grass head's life beyond three or four weeks, dilute a balanced liquid fertilizer to quarter-strength and mist the head with it once a week. Full-strength fertilizer in a compact sealed stocking can burn the roots.
Soil and growing media tips for specific challenges
The grass head doll itself always uses a contained, soilless mix, so issues like clay soil or sandy soil in your yard do not directly apply here. That said, the challenges around moisture retention, drainage, and growing environment carry over from outdoor lawn work in useful ways.
If your mix retains too much water (acts like clay)
Straight peat moss acts almost like clay when it gets compacted inside a stocking: it holds water until it is saturated and then roots suffocate. The fix is the same as amending clay soil in a lawn: add more perlite. Aim for at least a 1:1 ratio of perlite to peat in your mix. That keeps the structure loose and aerated even inside the tight stocking casing.
If your mix dries out too fast (acts like sandy soil)
Pure perlite or a very coarse mix drains so fast that the seeds dry out before they sprout. Increase the proportion of coco coir or peat to hold more moisture. The soak-from-below method (saucer with a small amount of water) also helps here, since it keeps the base of the head consistently damp without overwatering the top.
Low-light situations
If your space gets very little natural light (a north-facing room, basement, or shade-heavy apartment), grass will still germinate but it will grow pale, thin, and 'leggy' as it stretches toward any available light. University extension research recommends 14 to 16 hours of bright light daily for vigorous seedlings. A basic broad-spectrum LED grow light placed 3 to 6 inches above the grass head and run for 14 hours a day will produce dramatically better results than a dim window. This is a simple, affordable fix.
Pets and curious animals
Cats in particular are magnetically attracted to wheatgrass and will eat it enthusiastically, since it is essentially cat grass. If you are making a grass head doll in a pet household, place it on an elevated shelf or windowsill that is genuinely out of reach, or use a seed variety like fescue or ryegrass that is less aromatic and appealing to cats. If your cat does get at it, replace any eaten sections by misting a fresh pinch of seed onto the bare spots and covering loosely with a small piece of damp vermiculite.
Troubleshooting the most common problems
Mold on the surface
White or grey fuzzy mold on the stocking is almost always a sign of two combined problems: too much moisture and not enough airflow. The fix: reduce misting to once a day (or every other day), remove any plastic covering, and place the head somewhere with light air movement, even just in a room with a ceiling fan running on low. If mold is already established, remove the worst patches gently with a dry paper towel, then allow the surface to dry slightly before your next misting. Using a sterile seed-starting mix (rather than garden soil or potting mix with added compost) at the start dramatically reduces mold risk because it does not carry the fungal spores that garden soil contains.
Slow or uneven germination
If by day 10 you have patchy or no germination, the most common causes are: medium too dry (the seeds dried out before they could root), temperature too cold (below 55°F / 13°C for fescue or below 45°F / 7°C even for ryegrass), or seed quality issues. Check your seed germination percentage on the packet. Extension guides such as Selecting an Annual Ryegrass Variety, Mississippi State University Extension recommend using seed labeled for sprouting or with a high germination percentage, and advise increasing seeding rates or performing a small germination test when viability is unknown Selecting an Annual Ryegrass Variety — Mississippi State University Extension. If it is below 80 percent, you should have seeded more heavily to compensate. Extension guidance suggests running a simple germination test: place 10 seeds on a damp paper towel, fold it, and keep it at room temperature. Count how many sprout in 7 days. Use that percentage to calibrate how much seed to use in your next head.
Browning tips or yellowing grass
Yellow or brown tips after the first two weeks usually mean one of three things: the grass is running out of nutrients in the soilless mix, the roots have become waterlogged, or the grass is too long and the lower blades are being shaded out. Try diluting a liquid fertilizer to quarter-strength and applying it as a misting. If the medium smells stale, allow it to dry out more between waterings. Trimming the grass back to 2 to 3 cm also helps the lower growth access light and air again.
Algae (green slime on the saucer or base)
Green slime or algae on the saucer is harmless to the plant but means you are leaving standing water in the saucer for too long. Empty the saucer after each bottom-watering session rather than letting the head sit in pooled water. Rinsing the saucer every few days with hot water also prevents buildup.
When to use lawn grass varieties and when not to
A common question from homeowners who already have lawn seed in the garage is whether they can use it for a grass head. The answer depends on the variety.
Annual ryegrass and perennial ryegrass from a lawn bag: yes, these work very well. They are exactly the seeds described in the fast-germinating section above and they will produce great hair. Tall fescue from a lawn bag: also a yes, though check the germination percentage on the bag, since old or budget lawn seed bags sometimes contain seed blends with lower viability than dedicated sprouting seed.
Bermuda grass: generally not recommended for this project. Bermuda seed has slower, more inconsistent germination at cool indoor temperatures (it is a warm-season grass that wants soil temps above 65 to 70°F / 18 to 21°C to germinate reliably), and the fine texture, while lovely on a lawn, can look thin and sparse as doll hair until it fills in. You would be waiting 14 to 21 days or more for a result that wheatgrass would deliver in 7. Zoysia faces the same problem: it is a warm-season grass with notoriously slow germination (sometimes 14 to 21 days even under ideal conditions), making it one of the worst choices for a craft project where speed and density of results matter.
| Grass variety | Suitable for grass head? | Reason |
|---|---|---|
| Annual ryegrass | Yes, highly recommended | Fast (5 to 10 days), cold-tolerant, cheap |
| Perennial ryegrass | Yes | Similar to annual; slightly finer blade |
| Tall fescue | Yes | Good texture; check seed viability |
| Hard or creeping fescue | Yes | Very fine blades; attractive dense hair |
| Wheatgrass / wheat berry | Yes, fastest option | Sprouts in 2 to 4 days after pre-soak |
| Bermuda grass | Not recommended | Warm-season; too slow indoors, poor density |
| Zoysia grass | Not recommended | Very slow germination (14 to 21+ days) |
Quick project variants: Easter baskets, tray grass, and wheatgrass pots
The grass head doll is just one format. The same seeds and germination logic apply to a handful of related projects that are worth knowing about, especially around spring holidays.
- Easter basket grass: Line the inside of an Easter basket with a thin plastic bag, add 1 to 2 inches of moist seed-starting mix, and sow annual ryegrass or wheatgrass thickly across the surface. In 10 to 12 days you have a living green nest for Easter eggs. Start it March 22 to 24 for an April 5 Easter in 2026.
- Tray or flat grass: A simple nursery seed tray filled with moist coco coir and sown densely with ryegrass or wheatgrass produces a green carpet in about 10 days. This works as a table centerpiece, a photography prop, or a pet grass tray for cats.
- Wheatgrass juice pots: If you want to grow wheatgrass for juicing or as a kitchen superfood crop, use a dedicated wheat berry seed with documented high germination percentage and grow it in a shallow tray rather than a stocking. Pre-soak the berries 8 to 12 hours, keep them covered for the first 2 to 3 days (dark and humid), then move to bright indirect light. Harvestable at about 7 inches tall, usually by day 10 to 12.
- Presentation ideas: Googly eyes and felt faces turn a simple grass pot into a character. Small terra cotta pots painted to look like cartoon faces are another popular format that skips the stocking entirely, filling the pot with seeded mix and letting the grass grow straight up through the open top.
Regional climate adjustments and seasonal care
Because a grass head doll lives indoors, outdoor climate matters less than your indoor temperature and light levels. That said, there are some regional patterns worth being aware of.
Cold climates in winter: heating systems dry out indoor air significantly, which means the stocking surface can dry out faster than it looks. Check the head daily and increase misting frequency in winter. If you are growing near a heater vent, move the head at least a foot away or switch to a saucer-bottom-watering approach to maintain consistent moisture without surface drying.
Hot and humid climates year-round: the heat helps germination speed but humidity raises mold risk substantially. This is the one scenario where you may want to skip the plastic humidity dome entirely and rely entirely on daily misting plus good airflow. In consistently warm indoor spaces (above 75°F / 24°C), annual ryegrass and fescue will germinate on the fast end of their range, so you can tighten your timing by 2 to 3 days.
Seasonal light: in northern winters, natural window light is both weaker and shorter. If you are making a grass head doll between November and February in a northern climate, supplementing with a grow light is genuinely helpful rather than optional. A 14-hour light cycle at 4,000 to 6,500 Kelvin produces the kind of compact, upright grass growth you want. Without it, you may get pale, flopping blades that look less like hair and more like yellow straw.
Next steps: from craft grass to real lawns, and a note on grasshoppers
A grass head doll is a great entry point into the broader world of growing grass from seed, and many of the fundamentals carry over directly to lawn work. Understanding germination temperatures, seed viability, the importance of moisture consistency, and the difference between fast cool-season grasses (ryegrass, fescue) and slow warm-season grasses (bermuda, zoysia) are exactly the concepts that matter when you are seeding a bare patch in your yard or overseeding a full lawn. If you want to go further with any of those topics, whether it is seeding bare spots, working around clay or sandy soil, choosing between bermuda and zoysia, or timing a fall lawn seeding by region, this site covers all of those scenarios in dedicated guides.
One final redirect: if you arrived here looking for information on how to grow or raise grasshoppers, that question is about insect biology, not seed germination, and belongs in a pest management or entomology resource rather than a grass seed guide. Grasshoppers are one of the more damaging lawn pests in dry western and midwestern regions, and controlling them is a completely different conversation from growing grass, whether in a doll or in a yard.
FAQ
What is the central factual scope required for a publication‑ready guide on 'how to grow grass head doll' (grass heads/angel grass)?
A complete guide must define the craft (what a grass head doll is and common synonyms), list materials and equipment, identify fastest and suitable seed choices with botanical names, give precise step‑by‑step instructions for building, sowing and caring (indoor and outdoor options), provide germination timelines and ideal temperature/light/moisture ranges, describe trimming/styling methods, explain when common lawn varieties are or are not appropriate, include troubleshooting (mold, slow germination, browning, bare spots, media problems), safety/disposal guidance, and point readers to authoritative lawn‑establishment or pest resources for unrelated queries (e.g., grasshoppers). Each factual claim should be supported by verifiable sources (extension, NRCS, university publications, seed company protocols for sprouting).
Which authoritative source types should be cited to verify germination rates and ideal conditions for recommended seeds (annual ryegrass, quick‑germ fescues, wheatgrass)?
Use university extension publications (e.g., UC IPM, Penn State Extension, Iowa State, Cornell), USDA/NRCS fact sheets, and peer‑reviewed or extension seed/cover‑crop guides. For wheatgrass and sprouting specifics, reputable grow guides from agricultural extension or major seed suppliers are acceptable. Cite sources that state germination timelines, optimum seed‑zone temperatures and moisture requirements, and seeding/cover depths.
What specific seed information must be documented and where to verify it?
For each recommended seed provide: common name, botanical name (e.g., annual/Italian ryegrass: Lolium multiflorum), expected emergence time (days), ideal seed‑zone temperature range (°F/°C), recommended seeding depth or surface broadcast method, and recommended seeding rate for small craft use. Verify using university extension pages (UC IPM, Penn State, Cornell), USDA/NRCS fact sheets, and SARE/UC Davis cover crop guides.
What materials list should the article include (ordered, publication‑ready)?
Provide a single, ordered materials list for the craft such as: 1) nylon stocking or old sock (or small biodegradable fabric), 2) sterile seed‑starting mix or peat/coco coir blend, 3) perlite or vermiculite (optional for drainage), 4) grass seed (annual ryegrass, quick‑germ fescues, or wheatgrass—include botanical names), 5) water source and spray bottle, 6) rubber band or string, 7) permanent markers/paint and craft decorations, 8) small container/tray for catching water, 9) optional light source (grow light) or south/east windowsill, 10) scissors and small scoop. Cite seed‑starting best practices to justify using sterile soilless mix (UConn/Extension).
What step‑by‑step planting and care procedures should be provided and what sources back each step?
Provide numbered instructions: 1) hydrate/pre‑soak seeds if using wheatberries (8–12 hours) — cite wheatgrass grow guides; 2) prepare sterile seed‑starting mix (or prepackaged) and moisten — cite UConn seed‑starting guidance; 3) fill stocking and form head, secure with tie; 4) evenly add seeds on surface or press lightly and cover with thin vermiculite (¼–¾ in guidance for small seeds) — cite SARE/NRCS/extension seeding depth notes; 5) keep moist but not waterlogged; mist or bottom‑water and provide airflow to prevent mold — cite damping‑off prevention (UConn); 6) maintain ideal seed‑zone temps (cool‑season specs 65–75°F day for fastest germination) and move to bright indirect light after initial sprouting — cite Penn State/UMD; 7) trim/style hair as it grows and water regularly; 8) for outdoor placement, harden off seedlings before full sun/exposure and consult local lawn‑establishment resources if transplanting seed types — cite extension turf guides.
What germination timelines and temperature ranges must be stated for craft readers?
State expected visible sprouting: wheatgrass 1–4 days post‑soak, harvestable/visible hair ~7–12 days; annual (Italian) ryegrass emergence typically 5–10 days under favorable temps; quick‑germ fescues 5–12 days. Note optimal seed‑zone germination temperature ranges for cool‑season grasses roughly 68–86°F (20–30°C) for fastest germination, and that ryegrass can germinate at lower temps (down toward ~36–40°F / 2–4°C) but more slowly. Cite UC IPM, Penn State, Cornell, and wheatgrass grow guides.
Next Article
How to Grow Grass Heads: Lawn Repair, Care & Quick DIY Steps
Grow healthy lawn grass heads: seed choice, timing, seeding, care, repairs, and quick DIY Easter grass.