Mondo grass (Ophiopogon japonicus) is one of the best groundcovers you can plant in a shady spot where regular lawn grass refuses to cooperate. If you specifically mean carabao grass, the main difference is that it prefers warmer, wetter conditions, so adjust your site and watering accordingly how to grow carabao grass. It forms dense, low clumps of dark green, grass-like foliage, handles drought once established, and rarely needs mowing. To get dense coverage as fast as possible, plant divisions (not seed) in spring or early fall, space them 6 inches apart, keep the soil consistently moist but never soggy for the first 8 to 12 weeks, and top-dress with a thin layer of mulch. That combination alone will cut your establishment time nearly in half compared to spacing plants farther apart and watering inconsistently.
How to Grow Mondo Grass: Fast, Dense Coverage Guide

What mondo grass is and where it actually thrives
Mondo grass is a tough, clumping perennial groundcover native to Asia. It looks like a fine-bladed grass but it's actually related to lilies. The plants spread slowly by underground rhizomes, eventually knitting together into a dense mat that chokes out weeds and handles foot traffic reasonably well. It stays evergreen in warmer climates, which is a huge bonus if you're trying to fill a shaded area that looks dead all winter.
Where it thrives: USDA zones 6 through 10, with the sweet spot being zones 7 through 9. It handles heat and humidity well, which is why you see it everywhere in the Southeast and Pacific Coast. It prefers shade to partial shade, and NC State Extension specifically recommends it for shaded sites with moist, well-drained soil. If your yard gets full afternoon sun in a hot climate, mondo will struggle, bleach out, and grow slowly. Morning sun or dappled light is fine and actually gives you slightly faster establishment than deep shade.
Where it doesn't work as well: cold climates with hard freezes below about 0°F (zone 5 and colder) can kill it back to the ground or kill it outright. Wet, poorly draining soils are the other big killer. Standing water causes root rot fast. If your site stays soggy after rain, fix the drainage before you plant anything.
Seed vs. divisions: what to actually buy
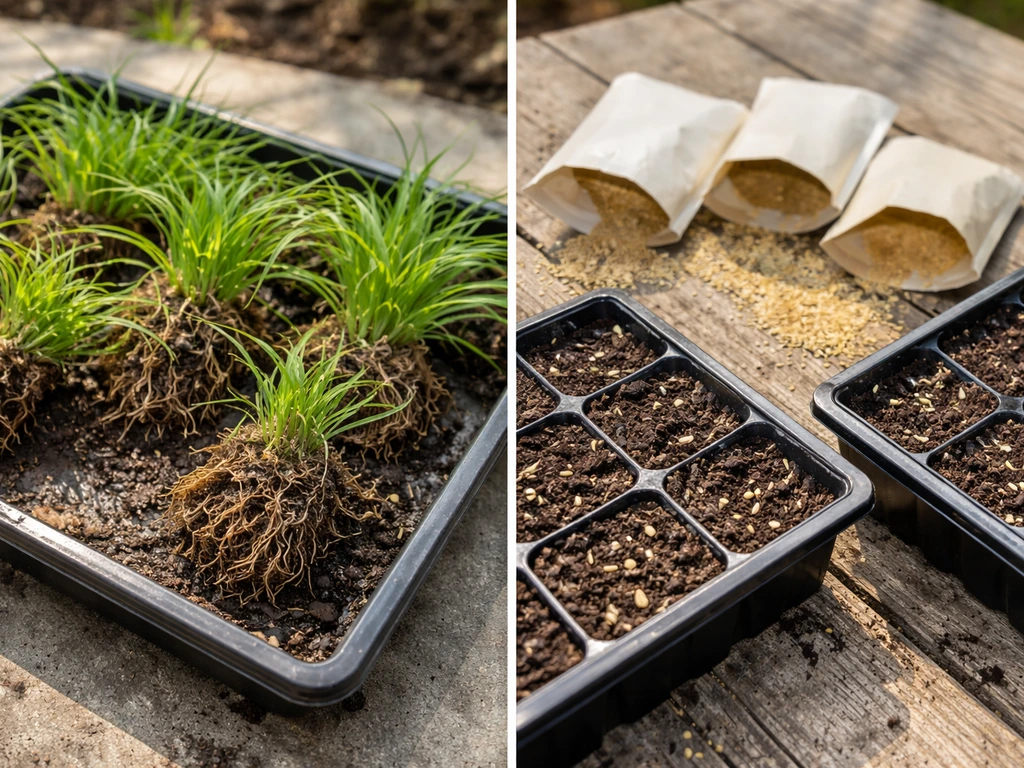
Here's the thing most articles gloss over: mondo grass seed is available, but it's slow, unreliable, and honestly not worth it for most homeowners. Seeds can take 30 to 60 days just to germinate under good conditions, and the plants will still need a full growing season before they start spreading. Unless you're covering a massive area on a tight budget, buy divisions or small potted plants instead.
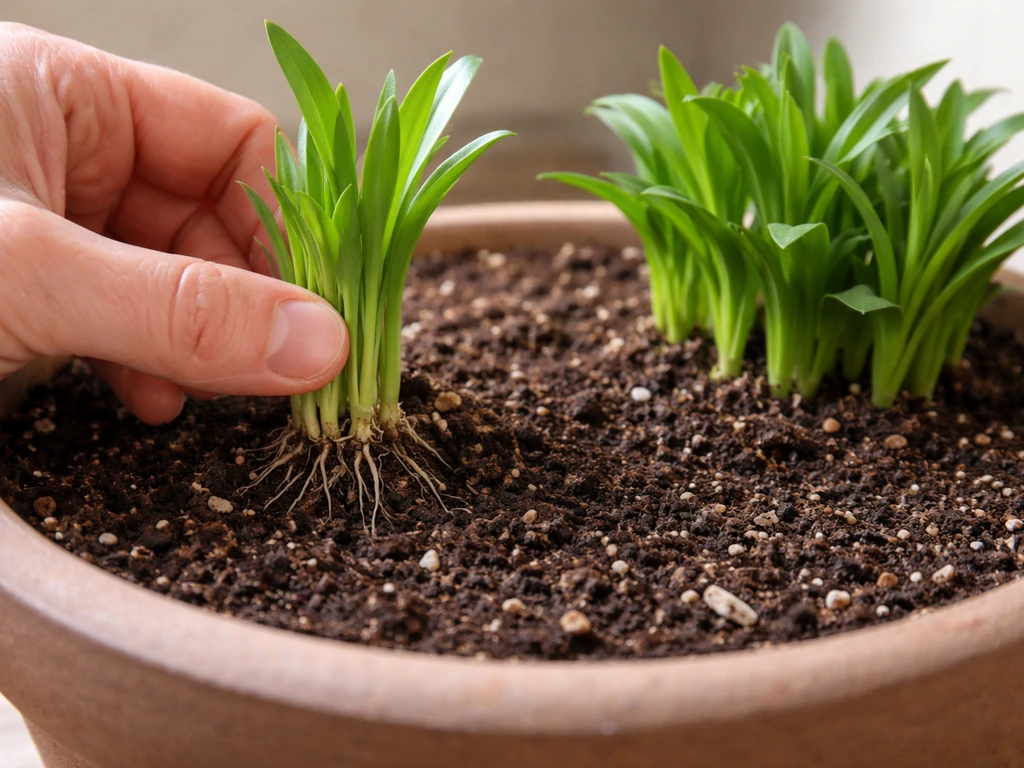
Divisions are clumps pulled from mature plants and replanted. They already have root systems, so they establish in weeks rather than months. You can buy them in small pots at a garden center, in cell packs (cheapest option), or order bare-root divisions online. For coverage, figure one plant per 6 square inches when spacing tight, or buy a flat of 18 to 32 cell-pack plugs for small areas.
If you already have mondo grass growing somewhere in your yard or know a neighbor who does, you can divide mature clumps yourself. Dig up a clump in early spring, pull it apart into smaller sections with at least 3 to 5 leaves and a bit of root, and replant right away. This is the cheapest route and works just as well as buying new plants.
| Planting material | Cost | Time to establish | Best for |
|---|---|---|---|
| Seed | Low | 6-12+ months | Large areas, patient gardeners |
| Cell-pack plugs | Low-moderate | 8-12 weeks | Most homeowners, budget-friendly |
| Potted plants (4-inch) | Moderate | 6-10 weeks | Faster fill, smaller areas |
| DIY divisions | Free | 8-12 weeks | Expanding existing patches |
Getting the soil and site right before you plant
Mondo grass is forgiving about soil type, but it has two non-negotiables: decent drainage and a pH between 5.5 and 6.5. Before you do anything else, take a look at how your soil drains after a heavy rain. If water sits for more than an hour or two, you need to fix that or mondo will rot. If your site drains fine, you're already ahead.
Clay soil
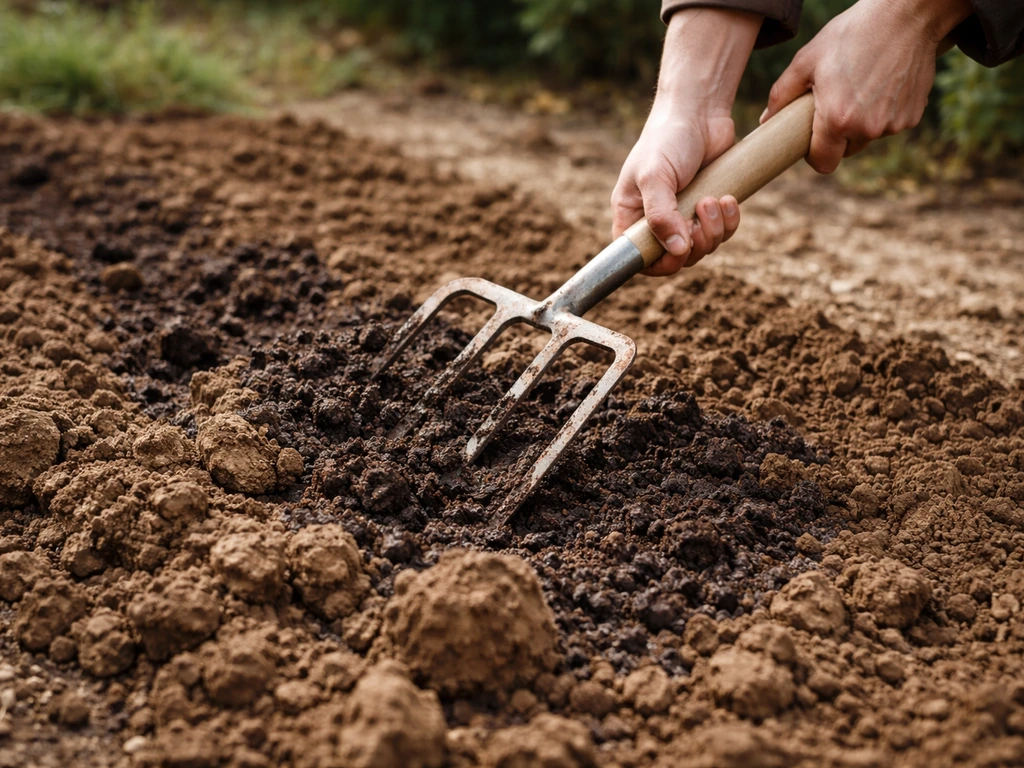
Clay is actually fine for mondo as long as drainage is decent. Work in 2 to 3 inches of compost and till or fork it 6 inches deep before planting. This breaks up compaction and improves drainage enough to prevent rot. Don't add sand to clay soil, it can make the texture worse rather than better.
Sandy soil
Sandy soil drains fast, sometimes too fast, so mundo grass can dry out quickly in its first weeks. Amend with 2 to 3 inches of compost worked in well to add moisture retention. You'll also need to water more frequently during establishment than you would in loamy or clay soil.
Sun and shade considerations
Mondo's real strength is shade tolerance. It handles everything from dappled light under trees to fairly heavy shade. If you're planting under established trees, be aware that tree roots will compete for water and nutrients, so check soil moisture more often and fertilize lightly to compensate. Full sun in hot climates causes leaf scorch and slows growth significantly. If your site gets more than 4 to 5 hours of direct sun in zones 8 and warmer, consider dwarf mondo or choose a slightly shadier spot.
pH is easy to test and worth doing. A simple $10 soil test kit from a garden center is enough. If your pH is above 6.5, add sulfur to acidify. If it's below 5.5, add a small amount of lime. Mondo isn't fussy, but outside that range it won't take up nutrients efficiently and growth will stall.
How to plant mondo grass for dense, fast coverage
Timing matters here. The best windows are mid-spring (once nighttime temps are consistently above 50°F) through early summer, or early fall (6 to 8 weeks before your first frost). Spring planting gives plants a full warm season to establish. Fall planting in zones 7 and warmer works well too, as roots continue growing even as top growth slows. Avoid planting in peak summer heat in zones 8 and above, the stress slows rooting significantly.
- Clear the area completely. Pull weeds, rake out debris, and remove any existing grass or groundcover. Mondo is slow enough in its first season that weed competition matters a lot.
- Loosen the soil 6 inches deep with a fork or tiller. Add 2 to 3 inches of compost and work it in thoroughly.
- If you have a soil test result outside the 5.5 to 6.5 range, amend with sulfur or lime now and water it in a day or two before planting.
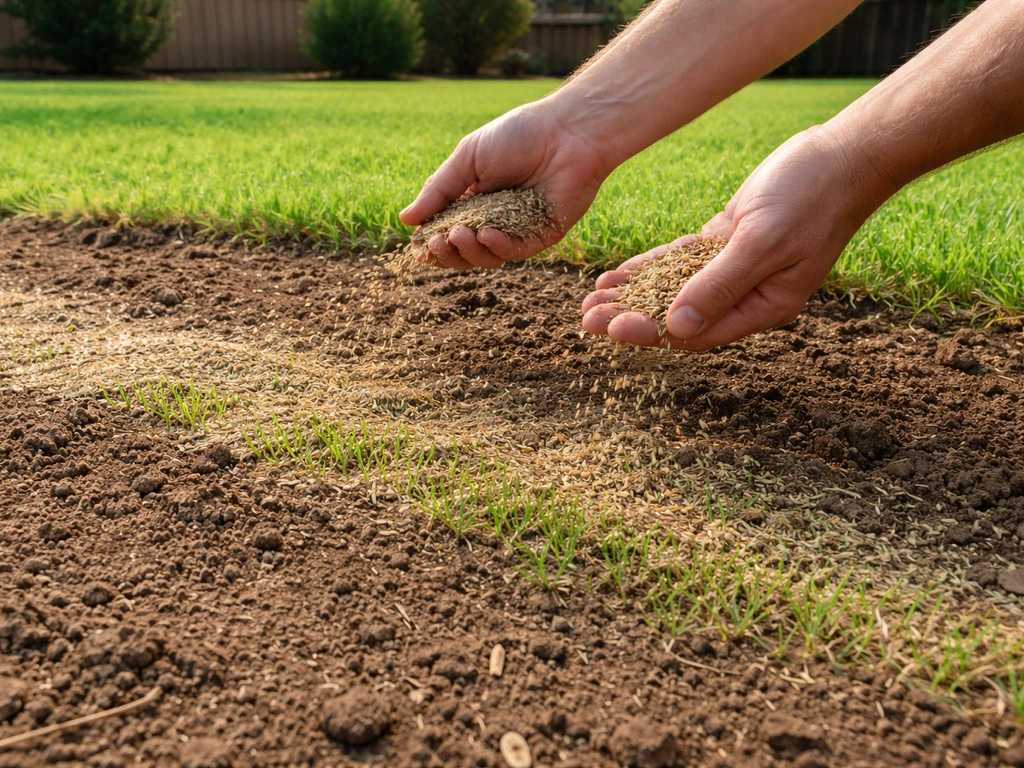
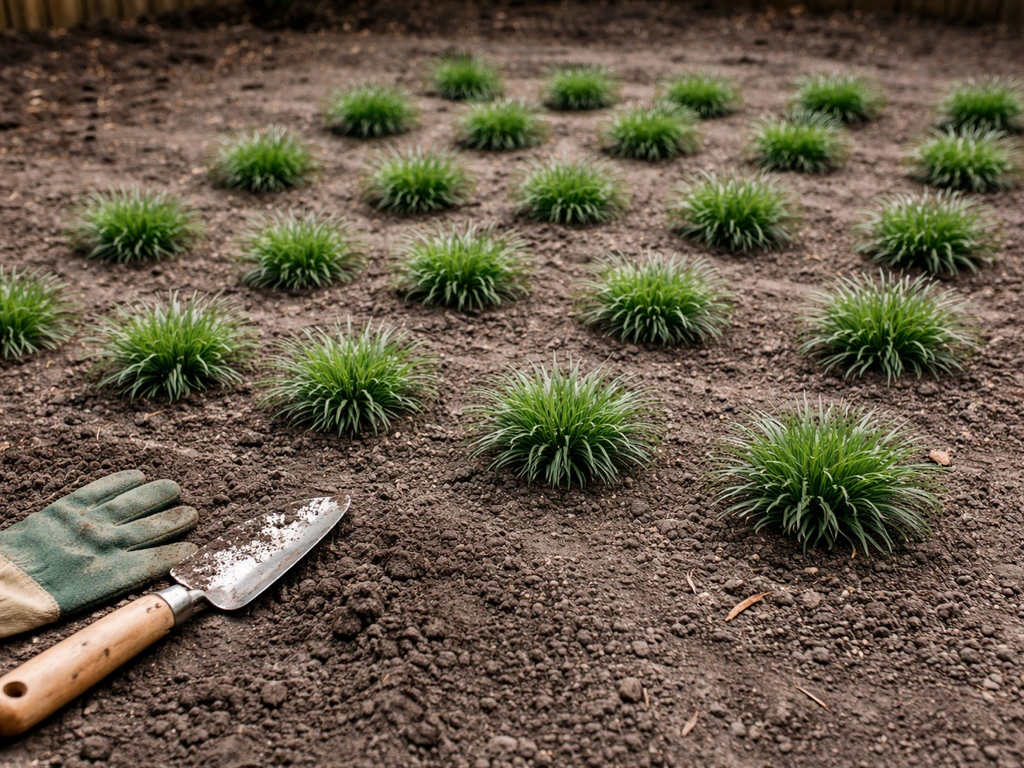
- Lay out your plants before you dig holes. Space them 6 inches apart in every direction for dense coverage in one season. If budget is tight, space 8 to 12 inches apart and accept that fill-in takes an extra season.
- Dig each hole just deep enough to match the root ball depth. Set the plant in so the crown (where leaves meet roots) sits at or just slightly above soil level. Planting too deep invites rot.
- Backfill, firm the soil gently around each plant, and water in thoroughly right away.
- Apply 1 to 2 inches of mulch (shredded bark, pine straw, or wood chips) around the plants but not touching the crowns. Mulch conserves moisture and suppresses weeds during establishment.
If you're planting under established trees, use a bulb planter or hand trowel to work around surface roots. Don't rototill under trees, it damages feeder roots and can stress the tree. Hand-placing plants works fine.
Watering, fertilizing, and mulching to speed things up
The single biggest reason mondo grass fails to establish quickly is inconsistent watering in the first 6 to 8 weeks. If you're looking for another hardy grass with a different purpose, learn how to grow vetiver grass next. If you're looking for a different grass with its own climate and watering needs, see also how to grow durva grass for tips tailored to that species. The roots need to be consistently moist, not wet, to grow into surrounding soil. Here's a practical schedule:
- Week 1 to 2: Water every day if there's no rain, keeping the top 2 inches of soil moist. Early morning watering is best to reduce fungal risk.
- Week 3 to 6: Water every 2 to 3 days, or whenever the top inch of soil feels dry. Reduce frequency if you're getting regular rain.
- Week 7 and beyond: Water once or twice a week until plants show clear signs of new growth (fresh leaf tips pushing out). After that, established mondo is reasonably drought-tolerant.
Don't overwater. This is the mistake I see most often. Soggy soil kills mondo roots fast, especially in heavy clay or poorly drained spots. If the soil feels wet 2 inches down, skip that day's watering.
Fertilizing: mondo doesn't need much, but a light feeding helps during the establishment phase. Apply a balanced slow-release granular fertilizer (something like 10-10-10) at half the label rate when you plant. Repeat once in midsummer if plants look pale or slow. Avoid high-nitrogen fertilizers, they push leaf growth at the expense of root development, which is the opposite of what you want in the first season.
Mulch is doing more work than most people realize. Two inches of shredded bark or pine straw around your plants (but not piled against the crowns) keeps soil moist between waterings, moderates soil temperature, and suppresses weeds. In shaded areas where you're already dealing with reduced light, weed competition is less intense, but mulch still pays off.
What to expect: establishment timelines and signs of progress
Mondo grass is not a fast mover compared to something like carpet grass or ryegrass. Setting realistic expectations here prevents a lot of unnecessary panic and overwatering. Here's what a normal establishment timeline looks like when starting from divisions or plugs:
| Timeframe | What to expect |
|---|---|
| Week 1-2 | Plants look the same as when you put them in. Some may droop briefly from transplant stress. This is normal. |
| Week 3-4 | Root anchoring begins. Plants no longer pull out easily when you tug gently. No visible spreading yet. |
| Week 5-8 | New leaf tips emerge from the center of each clump. This is the clearest sign of active establishment. |
| Month 3-4 | Clumps begin to widen slightly. Rhizomes start spreading underground. |
| Season 2 | Significant spread and fill-in between plants, especially if spaced at 6 inches. Area starts to look like a unified groundcover mat. |
If you planted from seed, add at least 30 to 60 days for germination to even start, then fold in the same establishment phases above. Seed-grown plants will be a full season behind division-grown plants in terms of spread. That's why most homeowners skip seed entirely.
Troubleshooting common problems
Plants are sitting there doing nothing (slow or no growth)
First, check if they're actually rooted. Give a plant a gentle tug: if it pulls out easily, it hasn't established yet. This usually means watering is off (too much or too little), the soil was too compacted, or you planted during a heat spike. Dig up one plant and look at the roots: white, firm roots are healthy; brown, mushy roots mean rot. Healthy but slow plants usually just need more consistent moisture and patience through the 4 to 6 week window.
Rotting or dying plants
Rot almost always comes down to two things: overwatering or poor drainage. If you're pulling up plants with dark, slimy roots, cut back watering immediately and check that water isn't pooling at the planting site. In extreme cases, you may need to remove affected plants, let the soil dry out for a week, then replant after amending with compost to improve drainage.
Patchy or uneven coverage
Some plants in a flat or batch may be weaker than others, which leads to uneven fill-in. Pull out dead or severely struggling plants and replace them. If most of your patchiness is in sunnier spots, those areas may be getting too much direct heat. Add temporary shade cloth for 2 to 3 weeks to help struggling plants root, or accept that you'll need a more shade-tolerant groundcover in those spots.
Weed invasion during establishment
Weeds filling in between newly planted mondo clumps is the most common frustration. Hand-pull weeds before they set seed. Don't use a pre-emergent herbicide right after planting, it can interfere with root development. A pre-emergent is fine to apply after your plants have been in the ground for 8 to 10 weeks. For now, mulch and hand-pulling is your best tool.
Yellowing or pale leaves
Pale or yellow leaves usually signal a pH problem, nitrogen deficiency, or too much direct sun. Test your soil pH first. If it's in range, apply a light dose of balanced fertilizer. If the plants are in a sunny spot and looking washed out, they're likely getting heat stress and may need more shade.
Your next steps starting today
Since today is late April, you're in an ideal window to plant mondo grass in most of zones 6 through 9. Here's exactly what to do starting now:
- Today: Assess your site. Check drainage (pour a bucket of water and see how fast it absorbs), note how many hours of sun it gets, and measure the square footage so you can calculate how many plants you need.
- This week: Buy a soil test kit, test pH, and pick up your plants. Cell-pack plugs or small 4-inch pots from a local garden center are your best bet right now. Buy 10% more plants than you think you need to cover gaps.
- Before planting: Clear weeds, loosen the soil 6 inches deep, and work in 2 to 3 inches of compost. Amend pH if needed.
- Planting day: Space plants 6 inches apart for fastest coverage, set crowns at soil level, water in thoroughly, and apply 2 inches of mulch.
- Weeks 1 to 2: Water daily in the morning. Check soil moisture 2 inches down before each watering. Skip if it still feels moist.
- Weeks 3 to 6: Shift to watering every 2 to 3 days. Watch for new leaf growth as your sign that roots are establishing.
- Week 8 and beyond: Apply a second light round of balanced fertilizer if growth looks slow. Hand-pull any weeds that are competing with your plants. Consider applying a pre-emergent at the 8 to 10 week mark to suppress future weed germination.
Mondo grass is one of those plants that rewards patience in year one and pays you back with almost zero maintenance in years two and three. It's particularly well-suited as a companion to other low-maintenance groundcovers like monkey grass, which handles similar shaded conditions and is worth considering if you need to fill areas where mondo might not be the right fit. Get the spacing tight, keep moisture consistent for the first couple of months, and you'll have solid coverage before the end of the growing season.
FAQ
Will mondo grass spread into my lawn or garden beds, and how do I contain it?
Mondo grass can spread, but you can control it by limiting where rhizomes run. Use a physical edging barrier (at least 8 to 10 inches deep) around the planting area, and re-cut any rhizomes that pop up outside the border during early spring or after a heavy mulching session.
What should I do if my mondo grass looks thin or patchy after planting?
For patchy areas, first confirm the plants are actually rooted by tugging gently. If they pull out easily, correct watering consistency (not just more water), then replace only the dead units. Avoid “overcorrecting” with extra fertilizer or frequent light watering, these often worsen shallow rooting.
How soon can I walk on newly planted mondo grass?
Yes, but wait until the plants are established. A safe rule is to delay walking on the area for about 4 to 6 weeks after planting, then use light foot traffic while the mat is knitting together. If plants are still loosening when tugged, traffic will pull them up.
How can I tell if mondo grass is rotting, and can I save the planting?
If you see mushy, slimy roots or plants that collapse from the base, stop watering immediately and check for standing water. In many cases you can salvage the bed by improving drainage with compost and aeration (forking), then replant after the soil dries for several days to a week.
My mondo grass leaves are yellowing. What usually causes it besides pH and how do I diagnose it quickly?
If grass is turning yellow but the soil pH is in range, look for watering swings and too much direct heat. In shaded sites, uneven moisture from low spots or dry pockets is common, so check the area by feel 2 inches down and water only where the soil is drying.
Do I need to mow mondo grass, and can I trim it to keep it neat?
Mondo grass generally does fine without frequent mowing, but you can trim to even up edges. Use sharp shears and cut lightly, removing only the top portion, then avoid another heavy trim for the rest of the season so new growth can rebuild roots.
How should watering and fertilizing change if I’m growing mondo grass under mature tree roots?
Yes, especially in deep shade under dense tree canopies where tree roots steal water. Instead of more fertilizer, keep moisture more consistent with a thin mulch layer and supplemental watering during dry spells, and consider thinning the tree roots only if you’re confident you can do it without damage.
When is it safe to use pre-emergent weed control after installing mondo grass?
Avoid pre-emergent herbicides right after planting because they can interfere with new root and early growth. After 8 to 10 weeks, you can use a pre-emergent carefully, following label directions for timing, and then resume hand-weeding until the plants fully knit together.
What’s the best way to handle mondo grass in a spot that gets some afternoon sun?
If your patch is largely shaded but gets a few hours of hot afternoon sun, consider a “dappled light” fix instead of switching products. Add temporary shade cloth for 2 to 3 weeks during heat spikes, and keep spacing tight so the plants knit together faster and buffer the microclimate.
How do I protect mondo grass in colder winters, and what should I do in spring?
In cold winters, mondo can die back or lose its look in zone edges. Plan on spring cleanup and re-establishing from surviving clumps, and protect the crown area with a light mulch layer rather than piling mulch against the crown.
How to Grow Grass in Texas: Step-by-Step by Region
Step-by-step plan to grow grass in Texas by region, choosing seed, timing, soil fixes, and fixing slow or bare spots.